Hosted Fields
Hosted fields solution is the best compromise between security, ease of customization and payment form integration.
Hosted Fields Workflow
- Communication with Tranzila servers is done via HTTPS inside our JavaScript file
- The merchant is responsible to design a payment page with a mandatory HTML form
- Tranzila’s thostedf.js JavaScript library must be included by the merchant in the html header tag
- Within said payment form, merchant must create hosted fields containers. These containers should be HTML block level tags (i.e. div but not span)
- Tranzila’s hosted fields JavaScript library injects Tranzila iframes in these containers, each containing a card data input field
- The Tranzila iframes send data exclusively to Tranzila's servers, employing security measures to ensure that sensitive information is not leaked to the merchant's web page or any other third-party iframes that may be present on the page.
- During the submission process, after the customer has entered their card information, the merchant's payment page must call the charge method of the hosted fields library, using the designated terminal name (specified by the "terminal_name" key) to identify the merchant account.
- Tranzila platform sends a request to the merchant acquirer and waits for the result.
- Res-lTranzila platform sends a request to the merchant acquirer and waits for the result.
- Result is then processed in the charge callback function and then notify the customer about whether the payment succeeded or failed.
Getting started
Tranzila’s hosted fields JavaScript file is available to use at:
https://hf.tranzila.com/assets/js/thostedf.js
Adding this to the merchant payment page as explained below, is all that needed to start using this feature.
<script src='https://hf.tranzila.com/assets/js/thostedf.js'></script>
SECURITY REQUIREMENT: Handshake Implementation
All use and interaction with Hosted Fields requires the use of a secure 'handshake.' Failure to implement the handshake may cause a system error or security vulnerability.
Generate this token via server-side request as detailed in the implementation guide.
Using TzlaHostedFields.create method
jQuery is included in the example for convenience purposes only. Merchant may opt to use any other JavaScript library/framework
-
Associate Tranzila fields with HTML container IDs:
credit_card_number(mandatory)cvv(depends on merchant's agreement with the acquirer)expiry(optional, but data is mandatory for transaction processing)- For
expiry, use either:- A single formatted text field
- Two dropdowns for month and year selection
- For
-
Always use
sandbox: false. -
Merchants may opt to use their own input fields for
expiry. -
Specify CSS styles for hosted input fields:
- Font size, family, and color
-
Customize hosted fields containers:
- Subscribe to events for validity/state updates
- Apply validity styles with
hosted-fields-invalidandhosted-fields-validCSS classes
-
Subscribe to Tranzila events with
onEventand a callback for:readyvalidityChangecardTypeChangefocusblursubmitrequest upon Enter key in hosted fields- Detect
update,empty, ornot emptyconditions googleIsEnableGoogle Pay wallet is enabled
JavaScript<script type="text/javascript"> var fields; $(document ).ready( function() { fields = TzlaHostedFields.create({ sandbox: false, fields: { credit_card_number: { selector: '#number', placeholder: '4580 4580 4580 4580', tabindex: 1 }, cvv: { selector: '#CVV', placeholder: '123', tabindex: 2 }, expiry: { selector: '#expiry', placeholder: '12/21', version: '1' } }, styles: { 'input': { 'height' : 'auto', 'width' : 'auto' }, 'select' : { 'height' : 'auto', 'width' : 'auto' } } }) }, );
Using Submit Handler
-
Prevent default submission is mandatory:
- Must call
fields.chargemethod during form submission.
- Must call
-
Merchant must provide key details:
terminal_namekey is used to identify the merchant's account.- Other keys may be sourced from the payment form or set by the merchant's systems.
- Refer to request keys for a full list of keys.
-
In the charge callback function, handle messages:
- First, examine the
messagesarray for errors.- Use
messageandparamkeys to identify messages related to specific fields.
- Use
- First, examine the
-
Upon successful charge:
- Inspect the
responsefield for payment details. - Notify the customer about the payment status accordingly.
- Inspect the
$(document).ready(function () {
	$('#payment_form').on('submit', function (e) {
		console.log('submit');
		e.preventDefault();
		chargeCcData();
	})
});

function chargeCcData() {
	console.log('start charging');

	fields.charge({
		//REQUIRED PARAMS, Those have to be in every card charge
		terminal_name: 'myterminal', // todo change it to correct terminal name
		amount: $('#amount').val(),
                thtk: $('#thtk').val(),
		//OPTIONAL FIELDS, you can add and remove if needed
		contact: $('#contact').val(),
		address: $('#address').val(),
		city: $('#city').val(),
		email: $('#email').val(),
		requested_by_user: 'your_api_username' //todo change to your api user name if you have one

		}, function(err, response) {
			console.log('err: ' + JSON.stringify(err));
			console.log('response:' + JSON.stringify(response));
			if (err) {
				handleErrors(err);
			}
			if (response) {
				parseResponse(response);
			}
		}
	);
}

function handleErrors(error) {
	error.messages.forEach(function(message){
		$('#errors_for_' + message.param).text(message.message);
	});
}
Creating Hosted Fields Containers
-
Verify Hosted Fields Containers:
- Ensure that the hosted fields containers match those defined in the
TzlaHostedFields.fields.selectorobject.
- Ensure that the hosted fields containers match those defined in the
-
Improve Accessibility with "label for":
- Use
label forattribute with the IDs of the hosted fields. - This ensures that the hosted fields are focused when the client clicks on the corresponding label.
- Use
<div class="col-md-4 mb-3">
    <label for="credit_card_number">Enter credit card</label>
    <div class="form-control" id="credit_card_number"></div>
    <div id="errors_for_number" class="error_message"></div>
</div>
3DS TRANSACTIONS
The Hosted Fields service supports 3DS security transactions (only if your terminal has enrolled in the service).
In a 3DS transaction, a challenge form may be presented to the user to verify their identity. In this scenario, an iframe (400x600) will be generated by the system in the center of the page to display the challenge form, which will be removed once the user completes the challenge or closes it.
Optional Parameters for 3DS Transactions
All optional 3DS parameters must be passed explicitly inside the fields.charge() call.
| Parameter | Values | Description |
|---|---|---|
force_challenge | 1 | Forces the card network to present a challenge form (e.g., an OTP) rather than silently passing or failing the transaction. |
force_txn_on_3ds_fail | Y / N | Y – Proceed with the transaction even if 3DS verification fails or the card does not support 3DS (no 3DS certificate will be issued). N – Do not proceed if 3DS verification fails or the card does not support 3DS. |
card_holder_name | string | Full name of the cardholder. Improves authentication data quality and may reduce the likelihood of a challenge being presented. |
card_holder_email | string | Email address of the cardholder. |
phone_country_code | string | International dialing code (e.g., +972). |
phone_number | string | Cardholder's phone number. |
Passing Cardholder Fields to the Charge Request
Add the cardholder fields as standard HTML inputs on your payment page:
<input type="text"  class="form-control" placeholder="card_holder_name"  id="card_holder_name">
<input type="email" class="form-control" placeholder="card_holder_email" id="card_holder_email">
<input type="text"  class="form-control" placeholder="phone_country_code" id="phone_country_code" value="+972">
<input type="text"  class="form-control" placeholder="phone_number"       id="phone_number">
Then read their values and pass them explicitly inside fields.charge():
fields.charge({
    terminal_name: 'myterminal',
    amount: $('#amount').val(),
    // 3DS optional parameters
    force_challenge: 1,
    force_txn_on_3ds_fail: 'N',
    // Cardholder identity fields for enhanced 3DS authentication
    card_holder_name:   $('#card_holder_name').val(),
    card_holder_email:  $('#card_holder_email').val(),
    phone_country_code: $('#phone_country_code').val(),
    phone_number:       $('#phone_number').val()
    }, function(err, response) {
        // handle response
    }
);
Test Credit Card Numbers for 3DS
- 3DS Frictionless Success:
4907639999909022 - 3DS Frictionless Fail:
4907639999990022 - 3DS Challenge Required:
4918914107195005(a challenge form will be displayed; enter555to pass).
Bit payment with hosted fields
Prerequisites
In adherence to Tranzila's developer guidelines, merchants are required to configure BIT on Tranzila for the charging terminal, ensuring that the merchant is listed as an authorized BIT seller. for more information please contact support.
Integration
The Bit transaction is restricted to the Israeli Shekel (ILS) currency and requires a minimum transaction amount of 5 ILS. Any transaction failing to meet these criteria will result in an error response.
During a BIT transaction, the system will dynamically generate an iframe positioned at the center of the page to present the QR code. Users are required to scan the code or input their details manually to finalize the transaction within the BIT application. Upon transaction completion, the iframe will automatically close, triggering the invocation of the chargeBit callback function along with the transaction result.
Note: The iframe closure is contingent upon either the completion of the transaction or a page reload.
Charging bit procedure:
The merchant is required to integrate a 'Charge with Bit' button at a suitable location on the webpage, which will, upon activation, invoke the fields.chargeBit method.
- Merchant must provide the following parameters :
terminal_namekey, used to identify merchants account.amount: (min 5 ILS)currency_code: ILS (only ILS)thtkHandshake identification string. See implementation guide
optional Bit parameters:
Bit iframe can be displayed in two formats: QR code only or QR code and phone field for sending SMS (see example below).
transaction_layout :”qr”or“qr-sms”(default: qr).bit_language : “hebrew”or“english”(default: english). Additional keys may be extracted from the payment form or established by the merchant systems. Within thechargeBitcallback function, merchants can manage error or success messages.
Iframe layout
- Iframe with two format option (size 410x850):

- Iframe with only qr code (size :310x300):

Code example for charging bit
function chargeBitData() {
        console.log('start charging BIT');

        fields.chargeBit({
            //REQUIRED PARAMS, Those have to be in every Bit charge
            terminal_name: $('#supplier').val(),
            currency_code: $('#currency_code').val(),
            amount: $('#amount').val(),
            thtk: $('#thtk').val(),

            //OPTIONALS BIT PARAMS
            transaction_layout: 'qr-sms',
            bit_language: 'hebrew',

            //OPTIONAL FIELDS, you can add and remove if needed
            response_language: 'english',
            contact: $('#contact').val(),
            company: $('#company').val()
        }, function (err, response) {
            //debugger;
            console.log('err: ' + JSON.stringify(err));
            console.log('response:' + response);
            if (err) {
                handleErrors(err);
            }
            if (response) {
                console.log(response);
            }
        }
        );
    }
Google Pay Payment with Hosted Fields
Create and Configure a Google Pay Button
- Add a Google Pay button anywhere on your page. This button will invoke the
fields.chargeGpaymethod upon activation. - By default, set the display of this button to
noneusing the CSS propertystyle="display: none;". - The hosted fields (HF) will automatically check if the client's device has a Google Pay wallet enabled for payment. If a Google Pay wallet is detected, HF will trigger the
googleIsEnableevent. No further action is required on your part to detect the wallet.
Using TzlaHostedFields.create Method
-
Use the following jQuery code to subscribe to the
googleIsEnableevent and show the button:JavaScript// Subscribe to the googleIsEnable event fields.onEvent('googleIsEnable', showGoogleButton); // Function to show the Google Pay button function showGoogleButton() { $('#payGoogle').show(); }Example Usage:
HTML<!-- Google Pay Button (Initially Hidden) --> <button class="pay_button" id="payGoogle" style="display: none;" onclick="chargeGooglePay();">Pay with Google Pay</button>
Charging Google Pay and Executing the Transaction
-
The call to
fields.chargeGpaymust include all required parameters as part of an object:-
terminal_name -
response_language -
currency_code -
amount -
tran_mode -
thtkHandshake identification string. See implementation guide -
All other fields are optional.
Code Example for Charging Google Pay:
JavaScript// Function to charge Google Pay function chargeGooglePay() { console.log('start charging Google'); fields.chargeGpay({ // REQUIRED PARAMS: These must be included in every charge terminal_name: $('#supplier').val(), response_language: 'english', currency_code: $('#currency_code').val(), amount: $('#amount').val(), tran_mode: $('#tran_mode').val(), thtk: $('#thtk').val(), // OPTIONAL FIELDS: You can add or remove as needed contact: $('#contact').val(), company: $('#company').val(), json_purchase_data : "%5B%7B%22product_name%22%3A%22product%22%2C%22product_quantity%22%3A1%2C%22product_price%22%3A1%7D%2C%7B%22product_name%22%3A%22product2%22%2C%22product_quantity%22%3A1%2C%22product_price%22%3A1%7D%2C%7B%22product_name%22%3A%22product3%22%2C%22product_quantity%22%3A1%2C%22product_price%22%3A1%7D%2C%7B%22product_name%22%3A%22product4%22%2C%22product_quantity%22%3A1%2C%22product_price%22%3A1%7D%2C%7B%22product_name%22%3A%22product5%22%2C%22product_quantity%22%3A1%2C%22product_price%22%3A1%7D%5D", }, function (err, response) { //debugger; console.log('err: ' + JSON.stringify(err)); console.log('response:' + JSON.stringify(response)); if (err) { handleErrors(err); } if (response) { console.log(response); } } ); } -
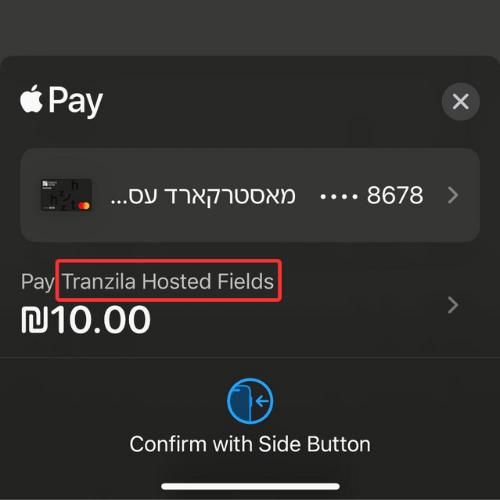
Apple Pay Payment with hosted fields
Prerequisites
Merchant must have Apple Pay configured on Tranzila for the charging terminal, according to Tranzila’s developer guide, with merchant site as an registered referrer for Apple Pay service.
for more guidance please visit the Apple Pay merchant setup guide
Integration
The initial step in the integration process involves ensuring that Tranzila’s hosted fields JavaScript file is accessible for use, is found at: https://hf.tranzila.com/assets/js/thfapplepay.js.
Simply incorporating this file into the merchant's payment page, following the instructions provided below, constitutes the necessary setup to begin utilizing this capability.
Charging apple procedure:
- Merchant must create a charge with Apple pay button anywhere in the page that must call
hfChargeApplemethod. - By default, the display setting of this button should be configured to
none(style="display: none;"). Upon document load, you can verify if the browser supports Apple Pay and modify the button display to become visible (using theblockorinlineattribute). you can use the example below (jQuery) for further assistance
if ((window.ApplePaySession) {
         $("#payApple").show()}
<button class="pay_button" id="payApple" style="display: none;"
onclick="hfChargeApple()">Pay with<img src="./assets/images/applepay_logo.png"></button>
	</div>
- The call to
hfChargeApplemust include all required parameters. - Utilize the same method as the primary hosted fields for callback function.
- Apple pay unique parameters
- The
labelAppleparameter is mandatory, it enables you to specify the name of the product or service for payment, which will be displayed on the iOS device during the Apple Pay payment process. The label should be provided in title case. For example: "VAT Tax", "Gift Wrap and Card", or "Discount". The label cannot be empty.
Remove any punctuation and whitespace after the label. - The
supported_networkparameter is optional and enables the merchant to specify the card types accepted by their terminal for payment processing. enabling payments through those Issuers.
The supported values for local cards are:['visa', 'masterCard', 'amex', 'discover']
and for foreign cards:['jcb', 'maestro']
- The
Required parameters
terminal_nameTranzila assigned terminal name for merchantamountcurrency_codeCurrency ISO code. Supported currencies: ILS, USD, EURlabelAppleproduct name / short item linetran_modeAllowed values: A,VthtkHandshake identification string. See implementation guide
Optional parameters
response_languageEnglish or Hebrewsupported_networkdefault values:['visa', 'masterCard', 'amex', 'discover']cotactpdescjson_purchase_datanotify_url- All optional fields are available for use.
Explanation of the labelApple parameter and its placement during an Apple Pay transaction.
Code example for charging Apple Pay
// Call the Tranzila hfChargeApple SDK method directly from the Apple Pay button
// (e.g. onclick="hfChargeApple()"). Do NOT wrap it in your own function —
// hfChargeApple is provided by Tranzila's hosted fields SDK.
hfChargeApple({

    // ===== REQUIRED PARAMS — must be sent on every Apple Pay charge =====

    // Product/service name shown on the iOS Apple Pay sheet.
    // Must be Title Case, non-empty, no trailing punctuation/whitespace (e.g. "Gift Wrap").
    labelApple: $('#labelApple').val(),

    // Tranzila-assigned terminal name identifying the merchant account.
    terminal_name: $('#supplier').val(),

    // Currency ISO code. Supported: ILS, USD, EUR.
    currency_code: $('#currency_code').val(),

    // Transaction amount.
    amount: $('#amount').val(),

    // Transaction mode. Allowed values: 'A' (charge) or 'V' (verification / J5).
    tran_mode: $('#tran_mode').val(),

    // Handshake identification string (token) obtained from the handshake step.
    thtk: $('#thtk').val(),

    // ===== OPTIONAL FIELDS — add or remove as needed =====

    // Language for API error messages: 'english' or 'hebrew'.
    response_language: 'english',

    // Card networks accepted by the terminal.
    // Local cards default: ['visa', 'masterCard', 'amex', 'discover']
    // Foreign cards: ['jcb', 'maestro']
    supported_network: ['visa', 'masterCard', 'amex', 'discover'],

    contact: $('#contact').val(),
    company: $('#company').val(),
    pdesc: $('#pdesc').val(),                 // Payment / product description
    json_purchase_data: $('#json_purchase_data').val(), // URL-encoded JSON purchase line items
    notify_url: $('#notify_url').val()        // Server-to-server notification URL

}, function (err, response) {
    // Callback fired when the transaction completes.
    console.log('err: ' + JSON.stringify(err));
    console.log('response:' + JSON.stringify(response));

    if (err) {
        handleErrors(err);      // Your error-handling function (renders field-level messages)
    }
    if (response) {
        parseResponse(response); // Your success handler for the transaction result
    }
});
Creating Non-Hosted Fields
- Additional Fields in Charge Function Call:
- Developers may include additional fields when invoking the
chargefunction. - These fields will be echoed back to the merchant after the transaction has been processed.
- The identity number field (credit_card_holder_id) can be optional. To make the ID field optional, developers can use a new additional field called
identity_number. When usingidentity_numberinstead ofcredit_card_holder_id, it allows the ID to be treated as an optional field or follow custom validation rules set by the developer. Tranzila will include this field in the transaction data sent to the credit card company for approval.
- Developers may include additional fields when invoking the
<div class="col-md-6 mb-3">
	<label for="city">City</label>
	<input type="text" class="form-control" id="city" name="city" placeholder="City" value="">
</div>
Paypal Payment With Hosted Fields
Prerequisites
PayPal Configuration on Tranzila:
- Ensure PayPal is configured on the Tranzila charging terminal.
- Follow Tranzila’s developer guide for setup.
- The merchant site must be listed as an authorized referrer.
Integration
-
Method Options for PayPal Redirection:
- Merchants can choose to use a "get" method URL redirection directly from the browser or perform a server-side redirect for added logic and/or security.
-
Redirection Options for PayPal Payment Page:
- Choose to redirect to a
popup_windowor replace the current browser page altogether.
- Choose to redirect to a
-
Examples for PayPal Integration:
-
For a "get" method with popup option, add the following to your page:
HTML<!-- PayPal Logo --> <table border="0" cellpadding="10" cellspacing="0" align="center"> <tbody> <tr><td align="center"></td></tr> <tr> <td align="center"> <a href="https://secure5.tranzila.com/cgi-bin/tranzila31p.cgi?supplier=<merchantterminal>¤cy=<currency>&sum=<amount>&useraction=commit" title="תשלום ב Paypal" onclick="javascript:window.open('https://secure5.tranzila.com/cgi-bin/tranzila31p.cgi?supplier=<merchantterminal>¤cy=<currency>&sum=<amount>&useraction=commit','WIPaypal','toolbar=no, location=no, directories=no, status=no, menubar=no, scrollbars=yes, resizable=yes, width=1060, height=700'); return false;"> <img src="https://www.paypalobjects.com/webstatic/mktg/Logo/pp-logo-100px.png" border="0" alt="PayPal Logo" /> </a> </td> </tr> </tbody> </table> <!-- PayPal Logo --> -
Additional parameters can be included in accordance with Tranzila’s developer guide.
-
For "server redirect" with popup option, use the following format:
HTML<!-- PayPal Logo --> <table border="0" cellpadding="10" cellspacing="0" align="center"> <tbody> <tr><td align="center"></td></tr> <tr> <td align="center"> <a href="<merchant paypal pre-process uri>" title="תשלום ב Paypal" onclick="javascript:window.open('<merchant paypal pre-process uri>','WIPaypal','toolbar=no, location=no, directories=no, status=no, menubar=no, scrollbars=yes, resizable=yes, width=1060, height=700'); return false;"> <img src="https://www.paypalobjects.com/webstatic/mktg/Logo/pp-logo-100px.png" border="0" alt="PayPal Logo" /> </a> </td> </tr> </tbody> </table> <!-- PayPal Logo --> -
The merchant's pre-process URI must issue a redirect to
https://secure5.tranzila.com/cgi-bin/tranzila31p.cgi, following the guidelines in Tranzila’s developer guide.
-
Bank Transfer Payment with Hosted Fields
Prerequisites
Merchant must have Bank Transfer configured on Tranzila for the charging terminal. For more information please contact support.
Integration
Bank Transfer transactions are restricted to Israeli Shekel (ILS) currency. Any transaction using a different currency will result in an error response.
When the fields.chargeBt method is called, the system dynamically generates an iframe at the center of the page. The payment flow consists of two steps:
-
Bank details form — The end customer enters their bank account details in the iframe: account type (personal or business), ID number, bank name, branch number, and account number.
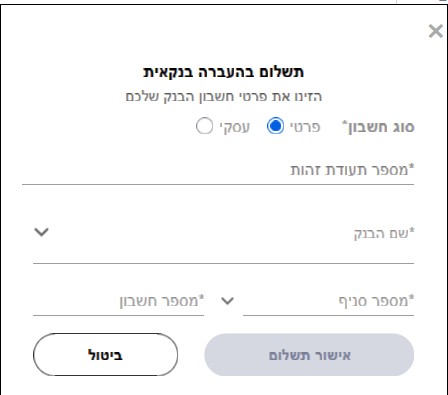
-
Bank verification — After submitting the form, the iframe presents a QR code and a button linking to the bank's website. The end customer must verify and approve the transaction through one of two methods:
- Scan the QR code with their mobile device to open and approve the transaction in their banking app.
- Click the button to navigate to their bank's website and approve the transaction in the browser.

Once the bank verification is complete, the iframe closes automatically and the chargeBt callback function is invoked with the transaction result.
The iframe closure is contingent upon either the completion of the transaction or a page reload.
Note: Bank Transfer does not require Handshake (thtk) because the bank-side authentication process serves as the transaction verification. However, if your payment page also supports other payment methods (such as credit card or Apple Pay), you must implement the Handshake mechanism for those methods. See Handshake implementation guide.
Charging Bank Transfer procedure:
The merchant is required to integrate a 'Pay with Bank Transfer' button at a suitable location on the webpage, which will, upon activation, invoke the fields.chargeBt method.
- Merchant must provide the following parameters:
terminal_namekey, used to identify the merchant's account.amount: transaction amount in ILS.currency_code: ILS (only ILS is supported).
Optional Bank Transfer parameters:
The Bank Transfer iframe currently supports Hebrew only, which is the default language. No language parameter is required.
response_language: Language for the transaction response messages. Accepted values:"hebrew"or"english".contact: Customer contact information.company: Customer company name.pdesc: Single product description.json_purchase_data: Invoice detailed product list.
Additional keys may be extracted from the payment form or established by the merchant systems. Within the chargeBt callback function, merchants can manage error or success messages.
Code example for charging Bank Transfer
function chargeBtData() {
    console.log('start charging BT');
    fields.chargeBt({
        //REQUIRED PARAMS, Those have to be in every Bank Transfer charge
        terminal_name: $('#supplier').val(),
        currency_code: 'ILS',
        amount: $('#amount').val(),

        //OPTIONAL FIELDS, you can add and remove if needed
        response_language: 'english',
        contact: $('#contact').val(),
        company: $('#company').val(),
        pdesc: $('#pdesc').val()
        //json_purchase_data: '%5B%7B%22product_name%22%3A%22product%22%2C%22product_quantity%22%3A1%2C%22product_price%22%3A1%7D%5D',
    }, function (err, response) {
        console.log('err: ' + JSON.stringify(err));
        console.log('response:' + JSON.stringify(response));
        if (err) {
            handleErrors(err);
        }
        if (response) {
            parseResponse(response);
        }
    }
    );
}
Request Keys
| Key | Mandatory | Default Value | Comment |
|---|---|---|---|
terminal_name | Yes | Tranzila assigned terminal name for merchant | |
tran_mode | No | A | Allowed values: A – debit transaction V – J5(Capture Funds) transaction N – J2(Validate) transaction |
thtk | Yes | Handshake identification string. Required for secure communication with Hosted Fields See implementation guide | |
card_holder_id_number | See comment | Subjected to merchant agreement with acquirer. If not required, you may omit this parameter, If used it is mandatory | |
identity_number | No | Can be used in non-hosted fields. The specified parameter will be sent to the credit card company for verification as the cardholder's identity number. | |
expiry_month | Yes | MM format – to use only if not using hosted fields’ expiry field | |
expiry_year | Yes | YYYY format – to use only if not using hosted fields’ expiry field | |
amount | Yes | In currency | |
currency_code | No | ILS | Currency ISO code. Supported currencies: ILS, USD, EUR |
payment_plan | No | 1 - regular | Allowed values: 1 – regular payment, no installments 6 – special credit plan 8 – installments |
first_installment_amount | See comment | Relevant for 8 payment term | |
other_installments_amount | See comment | Relevant for 8 payment term | |
total_installments_number | See comment | Relevant for 6,8 payment terms | |
tokenize | No | false | true or false |
response_language | No | English | English or Hebrew |
requested_by_user | No | API user name. In use to use your personal secret for response_hash generation. For more information view Response Hash | |
force_txn_on_3ds_fail | No | Y | Continue with the transaction if the credit card does not support 3DS or the 3DS verification fails. |
N | Do not perform the transaction if credit card verification fails or the credit card does not support 3DS. | ||
force_challenge | No | 0 | The credit card company decides when to request a challenge response from the client. |
1 | This increases the likelihood that a challenge form will be presented to the user. | ||
notify_url | No | none | URL endpoint for receiving transaction data (IPN) |
pdesc | No | none | Single product description |
json_purchase_data | No | none | Invoice detailed product list |
Response Keys
| Key | Description |
|---|---|
transaction_response | Container for actual transaction response |
transaction_response.success | Boolean. Can be true or false |
transaction_response.error | Shva error message translated to language selected in response_language |
transaction_response.transaction_id | Transaction unique ID in Tranzila gateway |
transaction_response.amount | Transaction amount |
transaction_response.currency_code | Transaction currency code |
transaction_response.credit_card_last_4_digits | Credit card last 4 digits |
transaction_response.token | Credit card token if requested in tokenize parameter |
transaction_response.user_form_data | Container for all 'non-hosted' fields sent in request |
transaction_response.card_type | the card brand: 1 - MasterCard, 2 - Visa, 3 - Diners, 4 - Amex, 5 - Isracard, 6 - Maestro |
transaction_response.card_mask | partially masked credit card number, showing only the first six and last four digits |
transaction_response.card_locality | domestic- Localy issued Israeli card. foreign - Tourist card issued abroad |
transaction_response.txn_type | verify debit |
transaction_response.tranmode | the value sent in tran_mode key |
transaction_response.card_type_name | the card brand |
transaction_response.cvv_status | CVV validation check from the issuer. 0 – Not entered 1 – Entered and valid 2 – Invalid 3 – Not checked |
transaction_response.id_status | ID validation check from the issuer. 0 – Not entered 1 – Entered and valid 2 – Invalid 3 – Not checked |
transaction_response.card_issuer | Credit card issuer: 0 - Tourist, 1 - Isracard, 2 - C.A.L, 6 - MAX, 12 - Israeli card not processed by Shva (e.g., Bank of Jerusalem and Postal Bank) |
transaction_response.payment_plan | Returns the payment plan value as specified in the original request parameters (1 – regular payment, 6 – special credit plan, 8 – installments). In case of debit card usage by the end customer, the value will return as 3. |
transaction_response.total_installments_number | The number of installments selected by the payer |
transaction_response.payment_method | Payment method used for the transaction. Returned for non-card payment methods (e.g., BANK_TRANSFER) |
errors | Array for all input and pre-transaction errors |
errors.code | Error code as listed in Error Codes |
errors.param | Parameter name used in call to charge |
errors.message | Error message code |
response_hash | Hashed string contains all the response json but the response_hash key and its value. For more information, see Response Hash |
Response Examples
Typical response for a regular credit card transaction with full card details and token for future use.
{
  "errors": null,
  "transaction_response": {
    "success": true,
    "error": null,
    "processor_response_code": "000",
    "transaction_id": "97588",
    "auth_number": "0000000",
    "amount": "10.00",
    "currency_code": 1,
    "credit_card_last_4_digits": "2312",
    "expiry_month": "12",
    "expiry_year": "26",
    "user_form_data": {
      "response_language": "",
      "contact": "john.doe@example.com",
      "company": "Example Corp",
      "json_purchase_data": "",
      "force_challenge": "0",
      "force_txn_on_3ds_fail": "N",
      "expiry": "",
      "notify_url": "",
      "shopify_id": "",
      "DCdisable": "",
      "requested_by_user": "merchant_user",
      "card_holder_id_number": ""
    },
    "card_type": "5",
    "card_mask": "458059****2312",
    "card_locality": "domestic",
    "txn_type": "debit",
    "tranmode": "A",
    "card_type_name": "Isracard",
    "cvv_status": "3",
    "id_status": "0",
    "card_issuer": "1",
    "token": "me4b50240d8c6222312",
    "payment_plan": 1,
    "total_installments_number": null
  },
  "response_hash": "7d7dfdbbd6e863ebb8b68c74a6080cdd26bbac4b39fe01a0aa3839ee6c63d217"
}
Error Messages
| Code | Meaning |
|---|---|
| 10000 | MANDATORY KEY IS MISSING |
| 10001 | INVALID TERMINAL NAME |
| 10002 | INVALID CREDIT CARD NUMBER |
| 10003 | INVALID CVV |
| 10004 | INVALID EXPIRATION MONTH |
| 10005 | INVALID EXPIRATION YEAR |
| 10006 | INVALID AMOUNT OR AMOUNT ZERO |
| 10007 | INVALID PAYMENT PLAN |
| 10008 | INVALID TOTAL INSTALLMENTS NUMBER |
| 10009 | INVALID FIRST INSTALLMENT AMOUNT |
| 10010 | INVALID OTHER INSTALLMENTS AMOUNT |
| 10011 | INVALID CARD HOLDER ID NUMBER |
| 10012 | INVALID CURRENCY |
| 10013 | TERMINAL NOT FOUND OR BAD CONFIGURATION |
| 10014 | INVALID TRAN MODE |
| 10015 | TOTAL INSTALLMENTS NUMBER MISSING |
| 10016 | INSTALLMENTS AMOUNT FIELDS MISSING |
Response Hash
To ensure the authenticity of a Tranzila response and confirm that it has not been altered by a third party, follow these steps:
Obtain a Secret Key
- Contact Tranzila support to obtain the general secret or your API login details.
- If you prefer to use a personal secret, request it from Tranzila support.
Using Your Personal Secret
- When making a charge request, include the
requested_by_userparameter with your Tranzila API username. - Example addition to the charge function:
function chargeCcData() {
  fields.charge({
    //REQUIRED PARAMS
    terminal_name: 'myterminal', // Replace with the correct terminal name
    amount: $('#amount').val(),
    //OPTIONAL FIELDS
    contact: $('#contact').val(),
    address: $('#address').val(),
    city: $('#city').val(),
    email: $('#email').val(),
    requested_by_user: 'your_api_username' // change to your Tranzila API username
  });
}
Validate the Response
To confirm the integrity of the response received from Tranzila, follow these steps:
1. Remove the response_hash Key and Value:
Remove the response_hash key and its corresponding value from the Tranzila response data.
2. Create a SHA256 Hash:
- Use the secret key provided by Tranzila support.
- Concatenate the remaining string from the response data.
3. Compare Hash Strings:
- Generate a SHA256 hash from the concatenated string.
- If the generated hash matches the
response_hashvalue that was initially in the Tranzila response, the authenticity of the response is confirmed.
echo hash_hmac('sha256', "payload data", "top secret", false);
Output: 966a9102fb76c62001543bb3666ed2024c3f033fc11226914b9ed1b8f1cd6348
Code Examples
- Minimal Code
- Installments
- Additional Fields
- Tokenization
- PayPal Integration
- React Sample Code (for stable node version 16)
- Angular Sample Code