Iframe Integration new DirectNG
Important Update: Change in URL, Update your systems for seamless integration now.
Please be aware that the URL for integration has been updated. Below are the new and old URLs:
-
The new URL to use is:
https://directng.tranzila.com/terminalname/iframenew.php -
The old URL was:
https://direct.tranzila.com/terminalname/iframenew.php
Please update your systems to reflect the new URL to maintain seamless integration functionality.
Secure Payment Page Integration - Introduction
In accordance with credit card companies' guidelines, which were established in 2012, it is prohibited to capture and transmit credit card details on a payment page of a website that has not been authorized to comply with the PCI DSS security standard.
To simplify the process for our customers, we developed an Iframe payment page hosted on Tranzila's servers that meets all the latest PCI-DSS security standard certifications and requirements.
To integrate the payment page directly on your website, you can use an Iframe. This method allows you to embed the payment interface seamlessly within your site, providing a cohesive user experience without redirecting customers to an external page.
Why use iframe?
The IFRAME tag allows another document to be hosted within an existing document in an inline frame. You can integrate your website with Tranzila's solution using IFRAME to keep your customers on your site while they pay within a secure framework.
By using IFRAME, you can display only the payment input fields of the redirect page within your site's iframe payment page, while still adhering to PCI-DSS's strict security standards.
Embedding an Iframe Payment Window on Your Website
By embedding an IFRAME payment window directly on your website, you can maintain a seamless user experience while ensuring that sensitive transaction data is protected. The IFRAME integration allows you to keep customers on your domain throughout the entire payment process, which helps build trust and improves conversion rates. All sensitive payment data is handled securely on Tranzila's PCI-DSS certified servers, ensuring compliance with the highest security standards while providing a smooth, integrated checkout experience for your customers.
Getting started
We recommend checking out our examples they are full of useful information to get started quickly!
iframe settings in the dashboard

Guide for Creating IFRAME Integration
This guide outlines how to prepare and send transaction data for IFRAME integration. It is crucial that the entire process is performed server-side and never on the client-side.
Data Transfer Methods
Data can be transferred to the payment page through either POST or GET methods. However, we strongly recommend using POST for enhanced security and to handle larger amounts of data.
Base URL
Your iframe base URL will be:
https://directng.tranzila.com/terminalname/iframenew.php
Replace terminalname with your actual terminal name.
Sending Transaction Parameters
You can send transaction parameters directly to the iframe URL using standard HTTP methods (POST or GET). All parameters should be sent as key-value pairs.
Minimum Required Parameters
At minimum, you need to send the following parameters:
sum- Transaction amountcurrency- Currency type (1 for ILS, 2 for USD, etc.)contact- Contact namecompany- Company nameemail- Email addresscountry- Countryzip- Zip/Postal codeaddress- Addresscity- City
Code Examples for Creating Iframe with POST
<!DOCTYPE html>
<html>
<head>
    <title>Tranzila Payment</title>
</head>
<body>
    <h2>Complete Your Payment</h2>

    <!-- Form that submits to iframe -->
    <form id="payment-form" action="https://directng.tranzila.com/terminalname/iframenew.php"
          method="POST" target="tranzila-iframe">

        <!-- Required Fields -->
        <input type="hidden" name="sum" value="100">
        <input type="hidden" name="currency" value="1">
        <input type="hidden" name="contact" value="John Doe">
        <input type="hidden" name="company" value="Test Company">
        <input type="hidden" name="email" value="test@example.com">
        <input type="hidden" name="country" value="Israel">
        <input type="hidden" name="zip" value="123456">
        <input type="hidden" name="address" value="123 Main St">
        <input type="hidden" name="city" value="Tel Aviv">

        <!-- Optional Fields -->
        <input type="hidden" name="cred_type" value="1">
        <input type="hidden" name="tranmode" value="A">
        <input type="hidden" name="success_url_address" value="https://mysite.com/success">
        <input type="hidden" name="fail_url_address" value="https://mysite.com/fail">
        <input type="hidden" name="lang" value="il">

        <button type="submit">Pay Now</button>
    </form>

    <!-- Iframe to display payment page -->
    <iframe name="tranzila-iframe"
            style="width: 100%; height: 600px; border: 1px solid #ccc;">
    </iframe>

    <script>
        // Auto-submit form when page loads
        document.addEventListener('DOMContentLoaded', function() {
            document.getElementById('payment-form').submit();
        });
    </script>
</body>
</html>
Receiving the Response
After the transaction is completed, the payment page will redirect to either the success or failure URL that you specified. The transaction data is returned as an array through POST or GET method to these URLs.
Response Structure
The response includes all the transaction details and results from the credit card processing. Here's an example of the response data you'll receive:
Response=000 (Success code)
[supplier] => yourterminal
[sum] => 100
[currency] => 1
[Response] => 000
[company] => Test Company
[contact] => John Doe
[email] => test@test.com
[phone] => 0500000000
[fax] => 0730000000
[address] => 123 Main St
[city] => Tel Aviv
[zip] => 123456
[pdesc] => Product description
[lang] => il
[transaction_id] => 41044
[index] => 41044
[ccno] => 4207
[transaction_source] => 1
[Responsecv] => 0
[Responseid] => 1
[cardtype] => 1
[cardissuer] => 1
[cardacquirer] => 2
[TranzilaTK] => token_value_here
[txn_type] => debit
[tranmode] => A
Key Response Fields
| Field | Description |
|---|---|
Response | Transaction result code (000 = success) |
transaction_id | Unique transaction ID in Tranzila system |
index | Transaction index number |
sum | Transaction amount |
currency | Currency code (1=ILS, 2=USD, etc.) |
ccno | Last 4 digits of credit card number |
cardtype | Card brand: 1 - Mastercard, 2 - Visa, 3 - Diners, 4 - Amex, 5 - Isracard, 6 - Maestro |
cardissuer | Card issuer: 0 - Tourist card issued abroad, 1 - Isracard, 2 - C.A.L, 6 - MAX, |
cardacquirer | Card acquirer / clearing company: 0 - Unknown tourist card issuer, 1 - Isracard, 2 - Visa Cal, 3 - Diners, 4 - American Express, 5 - Tranzila, 6 - Max, 7 - Cardcom, 9 - Finitione |
TranzilaTK | Tranzila token (if tokenization is enabled) |
txn_type | Transaction type (debit/verify) |
tranmode | Transaction mode sent in request |
Code Examples for Handling Response
<?php
// success.php - Handle successful transaction

// Get all POST data
$response = $_POST;

// Check if transaction was successful
if (isset($response['Response']) && $response['Response'] === '000') {
    // Transaction successful
    $transactionId = $response['transaction_id'];
    $amount = $response['sum'];
    $cardLast4 = $response['ccno'];

    echo "<h2>Payment Successful!</h2>";
    echo "<p>Transaction ID: " . htmlspecialchars($transactionId) . "</p>";
    echo "<p>Amount: " . htmlspecialchars($amount) . "</p>";
    echo "<p>Card ending in: " . htmlspecialchars($cardLast4) . "</p>";

    // Store transaction in database
    // saveTransaction($response);

} else {
    // Transaction failed
    $errorCode = $response['Response'] ?? 'Unknown';
    echo "<h2>Payment Failed</h2>";
    echo "<p>Error code: " . htmlspecialchars($errorCode) . "</p>";
}

// Log all response data
error_log("Tranzila Response: " . print_r($response, true));
?>
Additional Considerations
- Security: Always validate and sanitize response data on your server side
- Logging: Log all transaction responses for auditing and troubleshooting purposes
- Error Handling: Implement proper error handling for failed transactions
- Notify URL: Consider implementing a notify URL for asynchronous transaction notifications
Data Retrieval
Data retrieval occurs through an array containing the response from the credit card companies, along with the parameters entered on the payment page. This array is returned via POST or GET to the success or failure URL specified in the payment page settings by the merchant.
If a Notify page is configured, the transaction data will also be sent to it simultaneously.
iframe parameters table
| Parameter | Required | Values | Description |
|---|---|---|---|
| sum | Yes | Positive Decimal Number | Transaction sum |
| currency | Yes | 1 - NIS, 2 - US dollar 978 - Euro, 826 - Pound Sterling GBP | Transaction currency type |
| tranmode | Yes | A - Standard, V - Verification (J5), K - create token without checking card N - Verification (J2) | Transaction type |
| cred_type | No | 1 - One payment (default) 6 - Credit installments 8 - installments | Payment type. Default value is 1 if not sent. For credit payments use 6, for regular installments use 8 |
| accessibility | No | 2 | Accessibility Button - pass accessibility=2 to have an accessibility button |
| success_url_address | No | URL string | The url the user will be redirected to after a successful purchase, for example: https://my-website.com/success |
| fail_url_address | No | URL string | The url the user will be redirected to after a failed purchase, for example: https://my-website.com/failure |
| notify_url_address | No | URL string | The "Notify" page is intended to receive transaction data as they were actually performed and identify changes that occurred in the transaction data after they were sent, for example: https://my-website.com/notify |
| myid | No | 123456789 | The ID number can be sent in advance to the payment form |
| DCdisable | No | Unique string (max 254 characters) | Unique identifier for preventing duplicate transactions. Must be long and complex. See DCdisable section for details |
| opensum | No | 1 | Allows the customer to enter the amount to be charged. Send value 1 to enable, for example: opensum=1 |
| Ilang | No | HEB - Hebrew invoice, ENG - English invoice | Sets the language of the invoice sent to the customer. Requires the Invoices module. * |
predetermined additional fields
| Parameter | Description |
|---|---|
| company | Company name |
| contact | Contact name |
| address | Address |
| phone | phone number |
| city | City |
| pdesc | Basic Product description for invoice |
| remarks | Remarks |
| IMaam | VAT for invoice product list. IMaam can be sent as a fraction 0.18 or whole 18 number |
| Z_field | If you include the Z_field parameter in your request, its value will replace the corresponding value in zData that is sent to SHVA. |
Installments
There are two types of installment payments:
1. Regular Installments (cred_type=8):
must be with cred_type=8
The formula for calculating payments is: sum = fpay + spay*npay
The calculation formula for Installments is as follows:
The sum is equal to the first payment (fpay) plus the second payment (spay) multiplied by the number of payments (npay).
| Parameter | Values | Description |
|---|---|---|
| npay | Positive integer | number of installments after the first installment. npay= number of total installments - 1 |
| fpay | Positive integer/decimal number maxium 2 numbers after the dot | amount to pay on the first transaction |
| spay | Positive integer/decimal number maxium 2 numbers after the dot | amount to pay for every transaction after the first transaction |
| maxpay | Positive integer | Maximum number of installments. When using maxpay, Tranzila automatically calculates the division of payments without requiring fpay, npay, or spay parameters. This parameter replaces the need for manual calculation. Do not send fpay, npay, or spay when using maxpay. |
2. Credit Installments (cred_type=6):
Credit installments require the customer to have authorization from their credit card company to perform credit transactions.
must be with cred_type=6
Customer must have credit authorization from their credit card company
For credit transactions, you only need to send the npay parameter with a minimum value of 3.
| Parameter | Values | Description |
|---|---|---|
| npay | Integer (minimum 3) | Number of credit installments. Minimum is 3 installments. |
Display Settings
| Parameter | Values | Description |
|---|---|---|
| trBgColor | hexadecimal | background color |
| trTextColor | hexadecimal | text color |
| trButtonColor | hexadecimal | payment button color |
| buttonLabel | string | payment button text |
| hidesum | 1 | hide payment sum - it is possible to pass this Parameter only if the transaction is made through the token system and only if one of the following variables is sent: tranmode=V or tranmode=K or tranmode=N. |
| nologo | 1 | remove tranzila logo |
| hide_cc | 1 | hide the option to pay with credit card |
Language display options is set with the parameter - lang - using the following Values
| Values | Description |
|---|---|
| il | Hebrew |
| ar | Arabic |
| ru | Russian |
| es | Spanish |
| de | German |
| fr | French |
| jp | japanese |
Add Digital wallets Payment Options
| Parameter | Values | Description |
|---|---|---|
| ppnewwin | 2 | Add the option to pay with paypal |
| bit_pay | 1 | Add the option to pay with Bit |
| google_pay | 1 | Add the option to pay with Google, Note: add the allowpaymentrequest=true to the iframe |
| apple_pay | 1 | Add the option to pay with Apple Pay |
My Billing module Recurring Payment
My Billing Module Required - Paid Service
IMPORTANT: Recurring payment functionality is only available with Tranzila's My Billing service, which is a paid add-on module.
What is My Billing?
- My Billing is Tranzila's subscription and recurring payment management system
- It allows you to automate recurring charges on a set schedule (monthly, quarterly, yearly)
- Provides a dedicated dashboard for managing all recurring payments and subscriptions
- Includes automated billing, customer management, and reporting features
To use recurring payments:
- You must first purchase the My Billing module - contact Tranzila sales
- The My Billing service must be activated on your terminal
- All recurring payment parameters below are designed specifically for use with My Billing
Without My Billing:
- The recurring payment parameters (
recur_*) will not function - You will not be able to set up automated recurring charges
- Standard one-time payments will still work normally
For more information or to activate My Billing on your account, please contact Tranzila support or sales.
Recurring Payment Parameters:
| Parameter | Value | Description |
|---|---|---|
| recur_payments | Integer | The number of recurring charges that will be made — If this field is not passed, the recurring charge will not be limited and will run every month/quarter/year until manually turned off from the terminal. |
| recur_start_date | yyyy-mm-dd | The start date of the recurring charges (e.g., 2023-08-28) |
| recur_sum | Decimal | The recurring subscription charge amount charged on each billing cycle. Use together with sum when the initial charge differs from the ongoing subscription amount (e.g., a setup fee). |
| recur_transaction | 4 | Monthly payment — customer selects frequency at checkout |
| recur_transaction | 5 | Quarterly payment — customer selects frequency at checkout |
| recur_transaction | 7 | Yearly payment — customer selects frequency at checkout |
| recur_transaction | 4_approved | Monthly payment — frequency locked by merchant |
| recur_transaction | 5_approved | Quarterly payment — frequency locked by merchant |
| recur_transaction | 7_approved | Yearly payment — frequency locked by merchant |
Technical Specifications for Z_field Parameter
When integrating with our system, you will need to define a custom field called Z_field in the User Defined Fields section of your merchant account via the MY.TRANZILA interface. Here are the key details:
- Parameter Name:
Z_field - Maximum Length: 8 digits
- Type: Numeric
Example Usage:
"Z_field": 12345678
Working Method:
-
When
Z_fieldis Sent:- If you include the
Z_fieldparameter in your request, its value will replace the corresponding value inzDatathat is sent to SHVA.
- If you include the
-
When
Z_fieldis Not Sent:- If the
Z_fieldparameter is not included in the User Defined Fields and is not sent in the payment request, the transaction index will continue to be sent inzDataas usual.
- If the
Please ensure that the Z_field parameter is defined in the User Defined Fields via the MY.TRANZILA interface and is correctly included in your requests to customize the data sent to SHVA.
Invoice Product List (Product Details)
If you have purchased Tranzila's invoice module, you can use the detailed product list solution for the invoice to display the purchased items in separate rows on the invoice. Highlights for executing product details:
- If no VAT is applied, the final transaction price should equal the total
sumof the specified product prices and quantities. - If the amount is not equal, the invoice will display the product list without detailing the amount for each product.
- If a default VAT percentage is configured, you need to calculate the product price excluding VAT from the
product_priceand send this pre-VAT price for each product.
Notes for displaying product details on the invoice:
- A PDF file is produced in A4 size; if the invoice is larger than A4, the display will be cut off and not fully shown.
- For an invoice with an upper logo of 21056 mm, a lower logo of 11051 mm, and using a digital signature, up to 6 products can be properly displayed.
- If you waive the lower logo or digital signature, up to 10 products will be displayed.
- For more products, consider working with invoices not in A4 size, which will allow you to cut the invoice from the POS terminal.
List of product details object:
{
  "product_name": "Product name",
  "product_quantity": 1,
  "product_price": 20
}
With VAT percentage:
{
  "product_name": "Product name",
  "product_quantity": 1,
  "product_price": 17.09
}
Example of parameter json_purchase_data containing an array of product detail objects:
Example without VAT, the sum will be sum=20:
[ { "product_name":"product1", "product_quantity":1, "product_price":10 }, { "product_name":"product2", "product_quantity":1, "product_price":10 } ]
Example VAT applied, the sum is sum=20 with a VAT rate of 0.18 (18%):
[ { "product_name":"product1", "product_quantity":1, "product_price":8.47 }, { "product_name":"product2", "product_quantity":1, "product_price":8.47 } ]
The object array must be without spaces or line breaks, for example:
[{"product_name":"product1","product_quantity":1,"product_price":8.47},{"product_name":"product2","product_quantity":1,"product_price":8.47}]
In this example, each product's price before VAT is calculated as ( \frac{10}{1 + 0.18} \approx 8.47 ).
Encoding the json_purchase_data
Encoding is crucial when transferring JSON data like json_purchase_data over the web, encoding is essential to maintain the data's integrity. It ensures that special characters are safely transmitted by converting them into a URL-safe format. This prevents misinterpretation or data corruption during transmission, ensuring that your JSON data remains intact and correctly formatted when received by the server.
PHP encoding URL
Below is an example of how to encode a JSON array in PHP using the rawurlencode function:
PHP
<?php

// JSON array
$data = [
    ["product_name" => "product", "product_quantity" => 1, "product_price" => 1],
    ["product_name" => "product2", "product_quantity" => 1, "product_price" => 1],
    ["product_name" => "product3", "product_quantity" => 1, "product_price" => 1],
    ["product_name" => "product4", "product_quantity" => 1, "product_price" => 1],
    ["product_name" => "product5", "product_quantity" => 1, "product_price" => 1]
];

// Convert to JSON string
$json_string = json_encode($data);

// URL encode using rawurlencode
$encoded_string = rawurlencode($json_string);

echo $encoded_string; // Output: %5B%7B%22product_name%22%3A%22product%22%2C%22product_quantity%22%3A1%2C%22product_price%22%3A1%7D%2C%7B%22product_name%22%3A%22product2%22%2C%22product_quantity%22%3A1%2C%22product_price%22%3A1%7D%2C%7B%22product_name%22%3A%22product3%22%2C%22product_quantity%22%3A1%2C%22product_price%22%3A1%7D%2C%7B%22product_name%22%3A%22product4%22%2C%22product_quantity%22%3A1%2C%22product_price%22%3A1%7D%2C%7B%22product_name%22%3A%22product5%22%2C%22product_quantity%22%3A1%2C%22product_price%22%3A1%7D%5D
?>
Explanation:
-
JSON Data Conversion: The
json_encodefunction is used to convert the PHP array into a JSON string. This ensures that the data is in the correct format for URL encoding. -
URL Encoding: The
rawurlencodefunction is then used to encode the JSON string. This function encodes spaces as%20, matching the behavior you desire, unlikeurlencode, which would replace spaces with+.
Sending via POST
When sending product data in a POST request, it is crucial to ensure the data remains unaltered during transmission. Here's how you can do it with cURL:
<?php

// Prepare the product data array
$productData = [
    ["product_name" => "product", "product_quantity" => 1, "product_price" => 1],
    ["product_name" => "product2", "product_quantity" => 1, "product_price" => 1],
    ["product_name" => "product3", "product_quantity" => 1, "product_price" => 1],
    ["product_name" => "product4", "product_quantity" => 1, "product_price" => 1],
    ["product_name" => "product5", "product_quantity" => 1, "product_price" => 1]
];

// Convert product data to JSON string
$jsonString = json_encode($productData);

// URL encode the JSON string
$encodedString = rawurlencode($jsonString);

// Prepare other transaction data
$data = [
    "json_purchase_data" => $encodedString,
    "sum" => 100, // Example sum
    "currency" => 1,
    "tranmode" => "A", // Example transaction mode
    "contact" => "John Doe",
    "company" => "Test Company",
    "email" => "test@example.com",
    "address" => "123 Main St",
    "city" => "Tel Aviv",
    "country" => "Israel",
    "zip" => "123456"
];

// URL to send the POST request
$url = 'https://directng.tranzila.com/terminalname/iframenew.php';

// Initialize a cURL session
$ch = curl_init($url);

// Set cURL options for POST
curl_setopt($ch, CURLOPT_POST, true);
curl_setopt($ch, CURLOPT_POSTFIELDS, http_build_query($data));
curl_setopt($ch, CURLOPT_RETURNTRANSFER, true);
curl_setopt($ch, CURLOPT_HTTPHEADER, ['Content-Type: application/x-www-form-urlencoded']);

// Execute the cURL request
$response = curl_exec($ch);

// Check for errors during execution
if (curl_errno($ch)) {
    echo 'cURL error: ' . curl_error($ch);
} else {
    // Close the cURL session
    curl_close($ch);

    // Print the response from the server
    echo $response;
}
?>
By following this method in PHP, you can confidently manage the transmission of transaction data, maintaining its integrity throughout the process. The use of PHP's cURL for POST requests further facilitates stable and secure communication with the intended server endpoint.
Python encoding URL
In addition to using PHP's rawurlencode function for encoding URLs, you can also achieve similar encoding in Python using the urllib.parse.quote method.
In Python, you can use the urllib.parse module to URL-encode your JSON string in a manner similar to PHP's rawurlencode:
import json
from urllib.parse import quote

# JSON data
data = [
    {"product_name": "product", "product_quantity": 1, "product_price": 1},
    {"product_name": "product2", "product_quantity": 1, "product_price": 1},
    {"product_name": "product3", "product_quantity": 1, "product_price": 1},
    {"product_name": "product4", "product_quantity": 1, "product_price": 1},
    {"product_name": "product5", "product_quantity": 1, "product_price": 1}
]

# Convert to JSON string
json_string = json.dumps(data, separators=(',', ':'))

# URL encode using quote with safe set to empty string
encoded_string = quote(json_string, safe='')

print(encoded_string)   # Output: %5B%7B%22product_name%22%3A%22product%22%2C%22product_quantity%22%3A1%2C%22product_price%22%3A1%7D%2C%7B%22product_name%22%3A%22product2%22%2C%22product_quantity%22%3A1%2C%22product_price%22%3A1%7D%2C%7B%22product_name%22%3A%22product3%22%2C%22product_quantity%22%3A1%2C%22product_price%22%3A1%7D%2C%7B%22product_name%22%3A%22product4%22%2C%22product_quantity%22%3A1%2C%22product_price%22%3A1%7D%2C%7B%22product_name%22%3A%22product5%22%2C%22product_quantity%22%3A1%2C%22product_price%22%3A1%7D%5D
Explanation:
-
JSON Data Conversion: The
json.dumpsmethod is used to convert the Python list of dictionaries into a JSON string, withseparatorsset to(',', ':')to remove any spaces for a compact representation, replicating the PHP example. -
URL Encoding: The
quotefunction from theurllib.parsemodule is used to encode the JSON string. Thesafeparameter is set to an empty string ('') to ensure even standard safe characters are encoded, emulating the behavior ofrawurlencode.
This method ensures that spaces are encoded as %20 and not with a + sign, following the same principle as PHP's rawurlencode.
Sending via POST
When sending the transaction data in a POST request, it is crucial to ensure the data remains unaltered during transmission. The following approach utilizes Python's requests library for effective and secure handling of POST requests:
import json
import requests
from urllib.parse import quote

# Prepare the product data
product_data = [
    {"product_name": "product", "product_quantity": 1, "product_price": 1},
    {"product_name": "product2", "product_quantity": 1, "product_price": 1},
    {"product_name": "product3", "product_quantity": 1, "product_price": 1},
    {"product_name": "product4", "product_quantity": 1, "product_price": 1},
    {"product_name": "product5", "product_quantity": 1, "product_price": 1}
]

# Convert product data to JSON string and URL encode it
json_purchase_data = json.dumps(product_data, separators=(',', ':'))
encoded_string = quote(json_purchase_data, safe='')

# Prepare the full transaction data
transaction_data = {
    "json_purchase_data": encoded_string,
    "sum": 100,  # Example sum
    "currency": 1,
    "tranmode": "A",  # Example transaction mode
    "contact": "John Doe",
    "company": "Test Company",
    "email": "test@example.com",
    "address": "123 Main St",
    "city": "Tel Aviv",
    "country": "Israel",
    "zip": "123456"
}

# URL for the POST request
url = 'https://directng.tranzila.com/terminalname/iframenew.php'

# Sending POST request
response = requests.post(url, data=transaction_data)

# Check response
print(response.status_code, response.text)
By implementing this pattern, you harness Python's capabilities for handling HTTP requests securely, ensuring that your transaction data is transmitted correctly and safely across the web.
Examples
Basic POST Example
For the purpose of this tutorial we are gonna use our test url - https://directng.tranzila.com/terminal_name/iframenew.php - feel free to switch terminal_name with your terminal name.
we would like to charge an amount of 5 NIS, we will send the parameter sum=5 and currency=1(nis) using formData.
<!DOCTYPE html>
<html lang="en">
<head>
    <meta charset="UTF-8">
    <meta name="viewport" content="width=device-width, initial-scale=1.0">
    <title>Tranzila Payment</title>
    <link rel="stylesheet" href="https://stackpath.bootstrapcdn.com/bootstrap/4.4.1/css/bootstrap.min.css">
</head>
<body>
<main class="min-h750">
    <div class="container">
        <section id="main-content">
            <div class="row text-center mt-5">
                <div class="col">
                    <h1 class="display-3 text-primary">Pay Amount</h1>
                </div>
            </div>
            <div class="row mt-5">
                <div class="col-md-6">
                    <p class="text-center">Basic Payment Example:</p>
                    <form action="https://directng.tranzila.com/terminal_name/iframenew.php" target="tranzila" method="POST" novalidate="novalidate" autocomplete="off">
                        <input type="hidden" name="sum" value="5" />
                        <input type="hidden" name="currency" value="1" />
                        <button type="submit" name="submit" class="btn btn-primary mt-3" value="pay">Pay Now</button>
                    </form>
                </div>
            </div>
            <div class="row mt-5">
                <div class="col-md-6">
                    <div class="" style="width: 800px; height: 800px;">
                        <iframe id="tranzila-frame" name="tranzila" src="" style="width: 100%; height: 100%;"></iframe>
                    </div>
                </div>
            </div>
        </section>
    </div>
</main>
</body>
</html>
Bit Example
In order to add bit we will pass bit_pay=1 , or add it through tranzila settings:

<main class="min-h750">
    <div class="container">
        <section id="main-content">
            <div class="row text-center mt-5">
                <div class="col">
                    <h1 class="display-3 text-primary">Pay with Bit</h1>
                </div>
            </div>
            <div class="row mt-5">
                <div class="col-md-6">
                    <p class="text-center">Bit Payment Example:</p>
                    <form action="https://directng.tranzila.com/terminal_name/iframenew.php" target="tranzila" method="POST" novalidate="novalidate" autocomplete="off">
                        <input type="hidden" name="sum" value="5" />
                        <input type="hidden" name="currency" value="1" />
                        <input type="hidden" name="bit_pay" value="1" />
                        <button type="submit" name="submit" class="btn btn-primary mt-3" value="pay">Pay Now</button>
                    </form>
                </div>
            </div>
            <div class="row mt-5">
                <div class="col-md-6">
                    <div class="" style="width: 800px; height: 800px;">
                        <iframe id="tranzila-frame" name="tranzila" src="" style="width: 100%; height: 100%;"></iframe>
                    </div>
                </div>
            </div>
        </section>
    </div>
</main>
Installments Example
Installments are easy to enable with the npay, fpay, spay and the maxpay parameters npay - number of installments after the first transaction
fpay - amount to pay in the first transaction
spay - amount to pay for every transaction after the first transaction
maxpay - maximum amount of installments
Either pass 'npay', 'fpay', and 'spay' parameters, or just the 'maxpay' parameter, but do not pass them together.
Let's pass npay=4, fpay=20, spay=10
<main class="min-h750">
    <div class="container">
        <section id="main-content">
            <div class="row text-center mt-5">
                <div class="col">
                    <h1 class="display-3 text-primary">Pay Amount</h1>
                </div>
            </div>
            <div class="row mt-5">
                <div class="col-md-6">
                    <p class="text-center">Installments Example:</p>
                    <form action="https://directng.tranzila.com/terminal_name/iframenew.php" target="tranzila" method="POST" novalidate="novalidate" autocomplete="off">
                        <input type="hidden" name="sum" value="60" />
                        <input type="hidden" name="cred_type" value="8" />
                        <input type="hidden" name="spay" value="10" />
                        <input type="hidden" name="fpay" value="20" />
                        <input type="hidden" name="npay" value="4" />
                        <input type="hidden" name="currency" value="1" />
                        <button type="submit" name="submit" class="btn btn-primary mt-3" value="pay">Pay Now</button>
                    </form>
                </div>
            </div>
            <div class="row mt-5">
                <div class="col-md-6">
                    <div class="" style="width: 800px; height: 800px;">
                        <iframe id="tranzila-frame" name="tranzila" src="" style="width: 100%; height: 100%;"></iframe>
                    </div>
                </div>
            </div>
        </section>
    </div>
</main>
Let's pass maxpay=3 instead of fpay, npay, spay
<main class="min-h750">
    <div class="container">
        <section id="main-content">
            <div class="row text-center mt-5">
                <div class="col">
                    <h1 class="display-3 text-primary">Pay Amount</h1>
                </div>
            </div>
            <div class="row mt-5">
                <div class="col-md-6">
                    <p class="text-center">Choose Amount:</p>
                    <form action="https://directng.tranzila.com/terminal_name/iframenew.php" target="tranzila" method="POST" novalidate="novalidate" autocomplete="off">
                        <div class="form-group">
                            <label for="amount">Amount:</label> <br>
                            <input type="number" class="form-control col-md-12" name="sum" id="amount" value="5" required />
                        </div>
                        <input type="hidden" name="cred_type" value="8" />
                        <input type="hidden" name="maxpay" value="3" />
                        <input type="hidden" name="success_url_address" value="https://yoursite.com/success_url_address" />
                        <input type="hidden" name="fail_url_address" value="https://yoursite.com/fail_url_address" />
                        <input type="hidden" name="currency" value="1" />
                        <button type="submit" name="submit" class="btn btn-primary mt-3" value="pay">Pay Now</button>
                    </form>
                </div>
            </div>
            <div class="row mt-5">
                <div class="col-md-6">
                    <div class="" style="width: 800px; height: 800px;">
                        <iframe id="tranzila-frame" allowpaymentrequest='true' name="tranzila" src="" style="width: 100%; height: 100%;"></iframe>
                    </div>
                </div>
            </div>
        </section>
    </div>
</main>
Credit Installments Example (cred_type=6):
For credit installments, only pass npay with a minimum value of 3. The customer must have credit authorization from their credit card company.
<main class="min-h750">
    <div class="container">
        <section id="main-content">
            <div class="row text-center mt-5">
                <div class="col">
                    <h1 class="display-3 text-primary">Credit Payment</h1>
                </div>
            </div>
            <div class="row mt-5">
                <div class="col-md-6">
                    <p class="text-center">Credit Installments Example:</p>
                    <form action="https://directng.tranzila.com/terminal_name/iframenew.php" target="tranzila" method="POST" novalidate="novalidate" autocomplete="off">
                        <input type="hidden" name="sum" value="300" />
                        <input type="hidden" name="cred_type" value="6" />
                        <input type="hidden" name="npay" value="3" />
                        <input type="hidden" name="currency" value="1" />
                        <input type="hidden" name="tranmode" value="A" />
                        <button type="submit" name="submit" class="btn btn-primary mt-3" value="pay">Pay with Credit</button>
                    </form>
                </div>
            </div>
            <div class="row mt-5">
                <div class="col-md-6">
                    <div class="" style="width: 800px; height: 800px;">
                        <iframe id="tranzila-frame" name="tranzila" src="" style="width: 100%; height: 100%;"></iframe>
                    </div>
                </div>
            </div>
        </section>
    </div>
</main>
Recurring Payments
Requires My Billing Module (Paid Service)
Important: The recurring payment examples below require the My Billing module, which is a paid add-on service. Contact Tranzila sales to activate this feature on your terminal.
Recurring payments, also known as subscription payments or auto-pay, involve charging a customer's credit card on a pre-set, regular schedule. This could be monthly, quarterly, or annually, based on the terms agreed upon with the customer or set by yourself.
Examples: Let's assume we want the user to pay 100 NIS for joining our service and 20 NIS each month afterwards for 12 months:
sum = 100
recur_sum=20
recur_transaction=4
recur_payments=12
<main class="min-h750">
    <div class="container">
        <section id="main-content">
            <div class="row text-center mt-5">
                <div class="col">
                    <h1 class="display-3 text-primary">Recurring Payment</h1>
                </div>
            </div>
            <div class="row mt-5">
                <div class="col-md-6">
                    <p class="text-center">Recurring Payment Example:</p>
                    <form action="https://directng.tranzila.com/terminal_name/iframenew.php" target="tranzila" method="POST" novalidate="novalidate" autocomplete="off">
                        <input type="hidden" name="sum" value="100" />
                        <input type="hidden" name="recur_sum" value="20" />
                        <input type="hidden" name="recur_transaction" value="4" />
                        <input type="hidden" name="recur_payments" value="12" />
                        <input type="hidden" name="currency" value="1" />
                        <input type="hidden" name="lang" value="il" />
                        <button type="submit" name="submit" class="btn btn-primary mt-3" value="pay">Pay Now</button>
                    </form>
                </div>
            </div>
            <div class="row mt-5">
                <div class="col-md-6">
                    <div class="" style="width: 800px; height: 800px;">
                        <iframe id="tranzila-frame" name="tranzila" src="" style="width: 100%; height: 100%;"></iframe>
                    </div>
                </div>
            </div>
        </section>
    </div>
</main>
if we don't want to allow the user to pay the whole amount we can pass:
recur_transaction=4_approved
<main class="min-h750">
    <div class="container">
        <section id="main-content">
            <div class="row text-center mt-5">
                <div class="col">
                    <h1 class="display-3 text-primary">Recurring Payment</h1>
                </div>
            </div>
            <div class="row mt-5">
                <div class="col-md-6">
                    <p class="text-center">Recurring Payment (Approved) Example:</p>
                    <form action="https://directng.tranzila.com/terminal_name/iframenew.php" target="tranzila" method="POST" novalidate="novalidate" autocomplete="off">
                        <input type="hidden" name="sum" value="100" />
                        <input type="hidden" name="recur_sum" value="20" />
                        <input type="hidden" name="recur_transaction" value="4_approved" />
                        <input type="hidden" name="recur_payments" value="12" />
                        <input type="hidden" name="currency" value="1" />
                        <input type="hidden" name="lang" value="il" />
                        <input type="hidden" name="notify_url_address" value="https://my-website.com/notify" />
                        <button type="submit" name="submit" class="btn btn-primary mt-3" value="pay">Pay Now</button>
                    </form>
                </div>
            </div>
            <div class="row mt-5">
                <div class="col-md-6">
                    <div class="" style="width: 800px; height: 800px;">
                        <iframe id="tranzila-frame" name="tranzila" src="" style="width: 100%; height: 100%;"></iframe>
                    </div>
                </div>
            </div>
        </section>
    </div>
</main>
Apple Pay
As part of Tranzila's credit card clearing solutions, we enable integration with Apple Pay. Payment via Apple Pay allows customers to pay with the click of a button through Apple devices. This payment can be integrated as part of an app, E-commerce store, or landing page in various ways.
In this guide, we will describe the ways in which Apple Pay payment can be embedded.
Basic Assumptions:
The payment method is only supported by APPLE devices with Touch ID or Face ID, or those connected to the same network as an APPLE device with Touch ID or Face ID. These devices include APPLE devices such as IPHONE, IPAD, and APPLE laptops with a camera and/or fingerprint reader for user identification. You can see a full list of supported devices here. The payment method is only supported by APPLE software on these devices – namely, apps or the Safari browser. In other words, users on the CHROME browser cannot pay with APPLE PAY. Payment via Apple Pay – General Explanation:
In Israel, payment with APPLE PAY is essentially a credit card payment, where APPLE provides the user identity authentication infrastructure for the transaction only. After receiving approval from APPLE to make the payment, the transaction is processed by Shva.
After verifying the transaction with APPLE, APPLE sends to Shva, via Tranzila, a token used for charging. The translation of APPLE's token to the actual card number is performed by the credit card company/issuer.
Since this is the case, the response to an APPLE transaction is the regular response to a credit card transaction and includes the fields returned from a regular credit card transaction.
For Tranzila customers working with tokens, Tranzila treats the APPLE token as a regular credit card number, encrypts it on its servers, and returns it in the charging service as a Tranzila token for reuse.
The charging path in APPLE PAY differs between charging from a NATIVE app and charging through a web page. This document will detail the different paths to carry out these transactions.
script>document.write('<script src="https://directng.tranzila.com/js/tranzilanapple_v3.js?v=' + Date.now() + '"><\/script>');</script>
 <script>var $n = jQuery.noConflict(true);</script>
<main class="min-h750">
    <div class="container">
        <section id="main-content">
            <div class="row text-center mt-5">
                <div class="col">
                    <h1 class="display-3 text-primary">Apple Pay</h1>
                </div>
            </div>
            <div class="row mt-5">
                <div class="col-md-6">
                    <p class="text-center">Apple Pay Example:</p>
                    <form action="https://directng.tranzila.com/terminal_name/iframenew.php" target="tranzila" method="POST" novalidate="novalidate" autocomplete="off">
                        <input type="hidden" name="sum" value="5" />
                        <input type="hidden" name="currency" value="1" />
                        <input type="hidden" name="apple_pay" value="1" />
                        <button type="submit" name="submit" class="btn btn-primary mt-3" value="pay">Pay Now</button>
                    </form>
                </div>
            </div>
            <div class="row mt-5">
                <div class="col-md-6">
                    <div class="" style="width: 800px; height: 800px;">
                        <iframe id="tranzila-frame" name="tranzila" src="" style="width: 100%; height: 100%;"></iframe>
                    </div>
                </div>
            </div>
        </section>
    </div>
</main>
Google Pay
Google Pay is a new payment method that has been successfully launched.
Key Points:
- Works only with the new IFRAME page (not available for PAY page, DIRECT page, or old IFRAME pages)
- Free service for all customers at no additional cost to terminals
- Requires valid SSL certificate on the hosting page
- Supported on computers, Android, and Apple devices
- Compatible browsers: Google Chrome, Mozilla Firefox, Apple Safari, Microsoft Edge, and Opera
- Available in all supported languages (except Hebrew - displays in English when iframe language is set to Hebrew)
- Supports all currencies: ILS, USD, EUR, GBP, etc.
- Transaction types supported: tranmode A and V only (does not support token creation, pre-authorization, etc.)
Activation Methods:
- Send parameter
google_pay=1to the IFRAME page - Enable via MY TRANZILA: Settings > Terminal > IFRAME Settings
Important - Parent Page Configuration:
When embedding the IFRAME on your website, the parent page that hosts the iframe must include the allowpaymentrequest='true' attribute in the iframe tag for Google Pay to function properly:
<iframe name="tranzila-iframe"
        allowpaymentrequest='true'
        src="..."
        style="width: 100%; height: 600px;">
</iframe>
Payment Process:
- Customer clicks the Google Pay button
- Google popup opens for account login (or skips to card selection if already logged in)
- Customer selects saved card or adds a new one
- Customer is redirected to success/failure page
- Transaction creates a Tranzila token for future use (unlike Apple Pay)
Example:
<main class="min-h750">
    <div class="container">
        <section id="main-content">
            <div class="row text-center mt-5">
                <div class="col">
                    <h1 class="display-3 text-primary">Google Pay</h1>
                </div>
            </div>
            <div class="row mt-5">
                <div class="col-md-6">
                    <p class="text-center">Google Pay Example:</p>
                    <form action="https://directng.tranzila.com/terminal_name/iframenew.php" target="tranzila" method="POST" novalidate="novalidate" autocomplete="off">
                        <input type="hidden" name="sum" value="5" />
                        <input type="hidden" name="currency" value="1" />
                        <input type="hidden" name="google_pay" value="1" />
                        <button type="submit" name="submit" class="btn btn-primary mt-3" value="pay">Pay Now</button>
                    </form>
                </div>
            </div>
            <div class="row mt-5">
                <div class="col-md-6">
                    <div class="" style="width: 800px; height: 800px;">
                        <iframe id="tranzila-frame" allowpaymentrequest='true' name="tranzila" src="" style="width: 100%; height: 100%;"></iframe>
                    </div>
                </div>
            </div>
        </section>
    </div>
</main>
Notify Url
In order to add a notify url we will add the param notify_url_address:
result with approved https://directng.tranzila.com/tranzila1/iframenew.php?sum=100&lang=il&recur_transaction=4_approved&recur_sum=20&recur_payments=12¬ify_url_address=https://my-website.com/notify
Or add through tranzila settings:

Preventing Duplicate Transactions
DCdisable
The prevention solution is based on a unique value sent for a transaction under the parameter DCdisable. Below are the conditions for using the parameter:
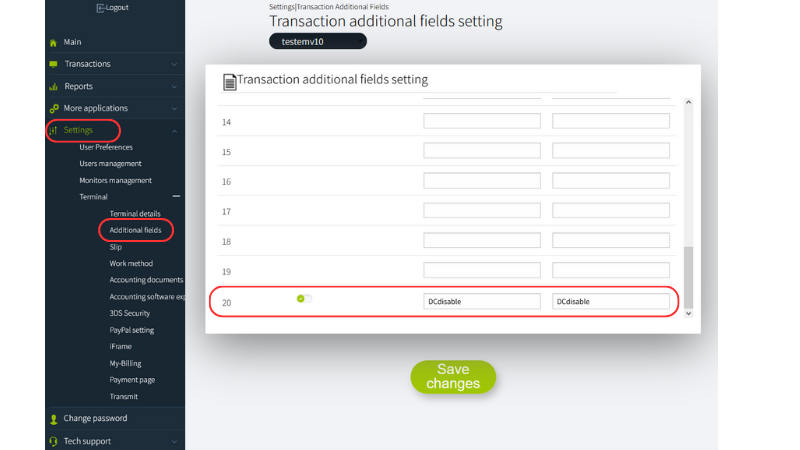
-
The solution is intended to work with a Direct IFRAME page.
-
You must log into the my.tranzila system and go to the "Additional Fields for Transaction" screen, located under the terminal settings menu, and define only field 20 as the field intended for identifying DCdisable - duplicate charge.
-
If it is detected that the unique value in DCdisable has already been used once, no additional charge will be made.
-
The check in our DB will be performed up to 24 hours back, at the parent terminal level.
-
If a transaction fails the first time, no check will be performed for it on DCdisable. We will display the following message if a duplicate transaction is detected: "This payment has already been made, please contact the business" or "This payment has already been paid. Please contact customer service."
-
The customer must pass the DCdisable parameter with a unique value for that transaction.
-
If you have parent and child terminals, you must define the parameter in both the parent and the child.
-
We recommend providing a long and complex unique value (the limit for the value is 254 characters).
Handshake
The Handshake is a fraud-prevention mechanism that locks the transaction amount on Tranzila's servers before the customer is directed to the payment page. A unique token (thtk) is generated server-side and passed to the iframe alongside the regular transaction parameters.
If the amount submitted on the checkout page does not match the amount registered in the handshake, the transaction is automatically blocked with error 912791.
Handshake is available for use in both iFrame and Hosted Fields payment pages.
⚠️ Using the HandShake solution requires the purchase of a Token Module. Contact Tranzila support to enable this feature.
Important
From the moment HandShake is activated on your terminal, all transactions must include a valid thtk token. Requests without a handshake token will be rejected. Ensure the solution is fully implemented before enabling it.
Enabling Handshake (iFrame only)
For iFrame integration, Handshake must first be enabled in the terminal settings:
- Log in to my.tranzila.com.
- Go to Settings → Terminal → iFrame.
- Open the Advanced tab.
- Click Enable Hand Shake.
When using Handshake with Hosted Fields, no dashboard configuration is required.
API Reference
Handshake V2 uses a dedicated API endpoint. The full specification is available in the Handshake V2 API reference.
Endpoint: POST https://api.tranzila.com/v2/handshake/create
Authentication is performed via four HMAC-SHA256 request headers. See the Authentication Guide for full details.
Request body:
| Parameter | Required | Description |
|---|---|---|
terminal_name | ✅ Yes | Your Tranzila terminal name |
sum | ✅ Yes | Transaction amount — must exactly match the amount sent to the payment page |
request_params | No | Free-form object for passing additional data (e.g. order ID, customer reference) that will be returned upon transaction completion |
Request example:
{
  "terminal_name": "myterminal",
  "sum": 150,
  "request_params": {
    "order_id": "ORD-9871",
    "customer_ref": "C-442"
  }
}
Success response:
{
  "error_code": 0,
  "message": "Success",
  "thtk": "w5bcd32faf6a60c621663d3f19dd87eda4729e94be"
}
Using the thtk Token
Once you receive the thtk token, pass it to the iFrame alongside all other transaction parameters (amount, currency, etc.):
- After form submission, Tranzila validates that the amount matches the handshake. If not,
"Illegal Operation 912791"is returned and no transaction is executed. - Attempting to access the checkout page without a valid
thtkwill result in an error.
Please note
Handshake data is retained for 20 minutes to allow for direct retries. A successful charge resets the timer.