Iframe Integration
your iframe base url will be - https://direct.tranzila.com/terminalname/iframenew.php
Secure Payment Page Integration - Introduction
In accordance with credit card companies' guidelines, which were established in 2012, it is prohibited to capture and transmit credit card details on a payment page of a website that has not been authorized to comply with the PCI DSS security standard.
In order to make it easier for our customers, we have developed the Redirect Page - a payment page hosted on Tranzila servers that has received and passed all the certifications and requirements of the new PCI-DSS security standard.
You can integrate the payment page as an external Direct payment page or as an internal payment page on your website through an Iframe.
Why use iframe?
By using the IFRAME tag, another document can be hosted within an existing document within an inline frame.
Your website can be integrated with TranZila's redirect solution using IFRAME to prevent your customers from leaving your website and paying inside the secure framework.
By using IFRAME, you can display only the payment input fields of the redirect page within your site's Iframe payment page while still adhering to PCI-DSS's strict security standards.
Using a redirect page
With this option, the user is automatically redirected to the external payment page from the website they were browsing. The page is designed with a basic default design that can be customized and changed according to the service's needs. You can define and modify the design to suitable colors, display the service provider's logo, an image, select fields to display, and more.
Using an Iframe Embedding Window on Your Website
With this option, the iframe is actually a derivative of the redirect page. You can define the relevant fields and embed them in the payment page of your website according to your needs. The main advantage of using the payment page as an Iframe is that the user stays on the website and does not go to an external payment page, thus not compromising the user experience and flow during the purchase process, resulting in higher conversion rates. The displayed logos can be removed and the background color can be changed to match the website's color, so the user doesn't even feel the difference, even though their details are being transferred from a different URL.
For both integration options, it is important to ensure that the data is transmitted securely and encrypted according to the PCI-DSS standard.
Getting started
We recommend checking out our examples they are full of useful information to get started quickly!
Choose iframe settings in the dashboard

Data transfer and retrieval in the payment page
Data transfer to the payment page can be done through either POST or GET. For a redirect payment page, parameters can only be sent through POST, while for an iframe payment page, data can be sent through both POST and GET. We recommend using POST for both types of payment pages.
Data retrieval is done through an array that contains the response from the credit card companies and the variables (parameters) that were entered in the payment page. This array is returned through POST or GET to the success/failure URL that was defined in the payment page settings (Merchant).
If a Notify page was defined, transaction data will also be sent to it in parallel.
your iframe base url will be - https://direct.tranzila.com/terminalname/iframenew.php
iframe parameters table
| Parmater | Values | Description |
|---|---|---|
| sum | Positive Decimal Number | Transaction sum |
| cred_type | 1 - Credit card 6- Credit 8 - installments | Payment type |
| currency | 1 - NIS, 2 - US dollar 978 - Euro, 826 - Pound Sterling GBP | Transaction currency type |
| tranmode | A - Standard, V - Verification (J5), K - create token without checking card N - Verification (J2) With token add K (AK, NK, VK) | Transaction type |
| accessibility | pass accessibility=2 to have an accessibility button | Accessibility Button |
| success_url_address | The url the user will be redirected to after a successful purchase, for example: https://my-website.com/success | Success url |
| fail_url_address | The url the user will be redirected to after a failed purchase | fail url, for exmaple: https://my-website.com/failure |
| notify_url_address | The "Notify" page is intended to receive transaction data as they were actually performed and identify changes that occurred in the transaction data after they were sent, for exmaple: https://my-website.com/notify | Notify url |
| Z_field | If you include the Z_field parameter in your request, its value will replace the corresponding value in zData that is sent to SHVA. |
predetermined additional fields
| Parmater | Description |
|---|---|
| company | Company name |
| contact | Contact name |
| address | Address |
| phone | phone number |
| city | City |
| pdesc | Basic Product description for invoice |
| remarks | Remarks |
Installments
must be with cred_type=8
The formula for calculating payments is: sum = fpay + spay*npay
The calculation formula for Installments is as follows:
The sum is equal to the first payment (fpay) plus the second payment (spay) multiplied by the number of payments (npay).
| Parmater | Values | Description |
|---|---|---|
| npay | Positive integer | number of installments after the first installment. npay= number of total installments - 1 |
| fpay | Positive integer/decimal number maxium 2 numbers after the dot | amount to pay on the first transaction |
| spay | Positive integer/decimal number maxium 2 numbers after the dot | amount to pay for every transaction after the first transaction |
| maxpay | Positive integer | maximum amount of installments |
Display Settings
| Parmater | Values | Description |
|---|---|---|
| trBgColor | hexadecimal | background color |
| trTextColor | hexadecimal | text color |
| trButtonColor | hexadecimal | payment button color |
| buttonLabel | string | payment button text |
| hidesum | 1 | hide payment sum - it is possible to pass this parmater only if the transaction is made through the token system and only if one of the following variables is sent: tranmode=VK or tranmode=K or tranmode=NK. |
| nologo | 1 | remove tranzila logo |
| hide_cc | 1 | hide the option to pay with credit card |
Language display options is set with the parameter - lang - using the following Values
| Values | Description |
|---|---|
| il | Hebrew |
| ar | Arabic |
| ru | Russian |
| es | Spanish |
| de | German |
| fr | French |
| jp | japanese |
Add Payment Options
| Parmater | Values | Description |
|---|---|---|
| ppnewwin | 2 | Add the option to pay with paypal |
| bit_pay | 1 | Add the option to pay with Bit |
| google_pay | 1 | Add the option to pay with Google, Note: add the allowpaymentrequest=true to the iframe |
3DS V2 Settings
| Parmater | Values | Description |
|---|---|---|
| newprocess | 1 | activating V2 on the 3DS system if it was not set in the settings |
Recurring Payment - Customer Choice
| Parmater | Values | Description |
|---|---|---|
| recur_payments | Integer | The number of recurring charges that will be made - If this field is not passed, the recurring charge will not be limited and will run every month/quarter/year until manually turned off from the terminal. |
| recur_start_date | yyyy-mm-dd (recur_start_date=2023-08-28) | The start date of the recurring charges |
| recur_transaction | 4 | monthly payment Customer Choice |
| recur_transaction | 5 | quarterly payment Customer Choice |
| recur_transaction | 7 | yearly payment Customer Choice |
| recur_transaction=4_approved | 4 | monthly payment Not Customer Choice |
| recur_transaction=5_approved | 5 | quarterly payment Not Customer Choice |
| recur_transaction=7_approved | 7 | Yearly payment Not Customer Choice |
Technical Specifications for Z_field Parameter
When integrating with our system, you will need to define a custom field called Z_field in the User Defined Fields section of your merchant account via the MY.TRANZILA interface. Here are the key details:
- Parameter Name:
Z_field - Maximum Length: 8 digits
- Type: Numeric
Example Usage:
"Z_field": 12345678
Working Method:
-
When
Z_fieldis Sent:- If you include the
Z_fieldparameter in your request, its value will replace the corresponding value inzDatathat is sent to SHVA.
- If you include the
-
When
Z_fieldis Not Sent:- If the
Z_fieldparameter is not included in the User Defined Fields and is not sent in the payment request, the transaction index will continue to be sent inzDataas usual.
- If the
Please ensure that the Z_field parameter is defined in the User Defined Fields via the MY.TRANZILA interface and is correctly included in your requests to customize the data sent to SHVA.
Invoice Product List (Product Details)
If you have purchased Tranzila's invoice module, you can use the detailed product list solution for the invoice to display the purchased items in separate rows on the invoice. Highlights for executing product details:
- The final transaction price must be equal to the prices and quantities detailed.
- If the amount is not equal, the invoice will display the product list without detailing the amount for each product.
- If a default VAT percentage is set, VAT must be extracted and the price per product sent as the price before VAT.
- To add product details on a Direct Clearance page or Iframe, send the parameter u71=1.
Notes for displaying product details on the invoice:
- A PDF file is produced in A4 size; if the invoice is larger than A4, the display will be cut off and not fully shown.
- For an invoice with an upper logo of 21056 mm, a lower logo of 11051 mm, and using a digital signature, up to 6 products can be properly displayed.
- If you waive the lower logo or digital signature, up to 10 products will be displayed.
- If you reduce or enlarge the lower or upper logo or both, the number of products that will fit on the invoice will change.
- The product description must include up to 118 characters.
- If the product description has more than 118 characters without spaces between them, the product description will appear as one string, but the invoice will be displayed in width.
- When printing an invoice from the Tranzila system (from the invoice module), the invoice will be printed on several pages, according to the number of products displayed. (A product description that is too wide will have the same effect as in a PDF)
- You can set the document type to be produced as an HTML file; it is created in the size suitable for the invoice regardless of the quantity or length of the products.
Technical Specifications
Create an array of objects in json in the following configuration:
| Field Name | Field Description |
|---|---|
| product_name | Product Name |
| product_quantity | Product Quantity - Number |
| product_price | Product Price |
For example:
[ { "product_name":"product", "product_quantity":1, "product_price":1 }, { "product_name":"product2", "product_quantity":1, "product_price":1 }, { "product_name":"product3", "product_quantity":1, "product_price":1 }, { "product_name":"product4", "product_quantity":1, "product_price":1 }, { "product_name":"product5", "product_quantity":1, "product_price":1 } ]
The object array must be without spaces or line breaks, for example:
[{"product_name":"product","product_quantity":1,"product_price":1},{"product_name":"product2","product_quantity":1,"product_price":1},{"product_name":"product3","product_quantity":1,"product_price":1},{"product_name":"product4","product_quantity":1,"product_price":1},{"product_name":"product5","product_quantity":1,"product_price":1}]
*Encode the object array (URL Encoder)
The encoding must be identical to the encoding of the rawurlencode function in PHP and not similar to the urlencode function in PHP.
The URL encoding cannot contain the character + as the urlencode function does; it encodes spaces as + instead of %20, for example:
%5B%7B%22product_name%22%3A%22product%22%2C%22product_quantity%22%3A1%2C%22product_price%22%3A1%7D%2C%7B%22product_name%22%3A%22product2%22%2C%22product_quantity%22%3A1%2C%22product_price%22%3A1%7D%2C%7B%22product_name%22%3A%22product3%22%2C%22product_quantity%22%3A1%2C%22product_price%22%3A1%7D%2C%7B%22product_name%22%3A%22product4%22%2C%22product_quantity%22%3A1%2C%22product_price%22%3A1%7D%2C%7B%22product_name%22%3A%22product5%22%2C%20%22product_quantity%22%3A1%2C%20%22product_price%22%3A1%7D%5D
Send under the parameter json_purchase_data:
json_purchase_data=%5B%7B%22product_name%22%3A%22product%22%2C%22product_quantity%22%3A1%2C%22product_price%22%3A1%7D%2C%7B%22product_name%22%3A%22product2%22%2C%22product_quantity%22%3A1%2C%22product_price%22%3A1%7D%2C%7B%22product_name%22%3A%22product3%22%2C%22product_quantity%22%3A1%2C%22product_price%22%3A1%7D%2C%7B%22product_name%22%3A%22product4%22%2C%22product_quantity%22%3A1%2C%22product_price%22%3A1%7D%2C%7B%22product_name%22%3A%22product5%22%2C%20%22product_quantity%22%3A1%2C%20%22product_price%22%3A1%7D%5D
Send the data in POST since the browser can decode the encoding and change it.
Examples
Table Of Content
Basic POST Example
For the purpose of this tutorial we are gonna use our test url - https://direct.tranzila.com/terminal_name/iframenew.php - fill free to switch terminal_name with your terminal name.
we would like to charge an amount of 5 NIS, we will send the parmater sum=5 and currency=1(nis) using fromData.
<main class="min-h750">
    <div class="container">
        <section id="main-content">
            <div class="row text-center mt-5">
                <div class="col">
                    <h1 class="display-3 text-primary">Pay Amount</h1>
                </div>
            </div>
            <div class="row mt-5">
                <div class="col-md-6">
                    <p class="text-center">Choose Amount:</p>
                    <form action="https://direct.tranzila.com/terminal_name/iframenew.php" target="tranzila" method="POST" novalidate="novalidate" autocomplete="off">
                        <div class="form-group">
                            <label for="amount">Amount:</label> <br>
                            <input name="sum" value="5" type="number" id="sum" class="form-control" />
                            <span class="text-danger"></span>
                        </div>
                        <input type="hidden" name="buttonLabel" value="Pay" />

                        <input type="hidden" name="success_url_address" value="https://yoursite.com/success_url_address" />
                        <input type="hidden" name="fail_url_address" value="https://yoursite.com/fail_url_address" />
                        <input type="hidden" name="currency" value="1" />

                        <button type="submit" name="submit" class="btn btn-primary mt-3" value="pay">pay</button>
                    </form>
                </div>
            </div>
            <div class="row mt-5">
                <div class="col-md-6">
                    <div class="" style="width: 800px; height: 800px;">
                        <iframe id="tranzila-frame" allowpaymentrequest='true' name="tranzila" src="" style="width: 100%; height: 100%;"></iframe>
                    </div>
                </div>
            </div>
        </section>
    </div>
</main>
Bit Example
In order to add bit we will need to pass bit_pay=1
<main class="min-h750">
    <div class="container">
        <section id="main-content">
            <div class="row text-center mt-5">
                <div class="col">
                    <h1 class="display-3 text-primary">Pay Amount</h1>
                </div>
            </div>
            <div class="row mt-5">
                <div class="col-md-6">
                    <p class="text-center">Choose Amount:</p>
                    <form action="https://direct.tranzila.com/terminal_name/iframenew.php" target="tranzila" method="POST" novalidate="novalidate" autocomplete="off">
                        <div class="form-group">
                            <label for="amount">Amount:</label> <br>
                            <input name="sum" value="5" type="number" id="sum" class="form-control" />
                            <span class="text-danger"></span>
                        </div>
                        <input type="hidden" name="buttonLabel" value="Pay" />

                        <input type="hidden" name="bit_pay" value="1" />
                        <input type="hidden" name="success_url_address" value="https://yoursite.com/success_url_address" />
                        <input type="hidden" name="fail_url_address" value="https://yoursite.com/fail_url_address" />
                        <input type="hidden" name="currency" value="1" />

                        <button type="submit" name="submit" class="btn btn-primary mt-3" value="pay">pay</button>
                    </form>
                </div>
            </div>
            <div class="row mt-5">
                <div class="col-md-6">
                    <div class="" style="width: 800px; height: 800px;">
                        <iframe id="tranzila-frame" allowpaymentrequest='true' name="tranzila" src="" style="width: 100%; height: 100%;"></iframe>
                    </div>
                </div>
            </div>
        </section>
    </div>
</main>
Or add through through tranizla settings:

Installments Example
Installments are easy to enable with the npay, fpay, spay and the maxpay parmaters npay - number of installments after the first transaction
fpay - amount to pay in the first transaction
spay - amount to pay for every transaction after the first transaction
maxpay -maximum amount of installments
Either pass 'npay', 'fpay', and 'spay' parameters, or just the 'maxpay' parameter, but do not pass them together.
Let's pass npay=4, fpay=20, spay=10 and most importantly cred_type=8
<main class="min-h750">
    <div class="container">
        <section id="main-content">
            <div class="row text-center mt-5">
                <div class="col">
                    <h1 class="display-3 text-primary">Pay Amount</h1>
                </div>
            </div>
            <div class="row mt-5">
                <div class="col-md-6">
                    <p class="text-center">Choose Amount:</p>
                    <form action="https://direct.tranzila.com/terminal_name/iframenew.php" target="tranzila" method="POST" novalidate="novalidate" autocomplete="off">
                        <div class="form-group">
                            <label for="amount">Amount:</label> <br>
                            <input name="sum" value="60" type="number" id="sum" class="form-control" readonly />
                            <span class="text-danger"></span>
                        </div>
                        <input type="hidden" name="buttonLabel" value="Pay" />

                        <input type="hidden" name="bit_pay" value="1" />
                        <input type="hidden" name="npay" value="4" />
                        <input type="hidden" name="spay" value="10" />
                        <input type="hidden" name="fpay" value="20" />
                        <input type="hidden" name="cred_type" value="8" />
                        <input type="hidden" name="success_url_address" value="https://yoursite.com/success_url_address" />
                        <input type="hidden" name="fail_url_address" value="https://yoursite.com/fail_url_address" />
                        <input type="hidden" name="currency" value="1" />

                        <button type="submit" name="submit" class="btn btn-primary mt-3" value="pay">pay</button>
                    </form>
                </div>
            </div>
            <div class="row mt-5">
                <div class="col-md-6">
                    <div class="" style="width: 800px; height: 800px;">
                        <iframe id="tranzila-frame" allowpaymentrequest='true' name="tranzila" src="" style="width: 100%; height: 100%;"></iframe>
                    </div>
                </div>
            </div>
        </section>
    </div>
</main>
Let's pass maxpay=3 instead of fpay, npay, spay
<main class="min-h750">
    <div class="container">
        <section id="main-content">
            <div class="row text-center mt-5">
                <div class="col">
                    <h1 class="display-3 text-primary">Pay Amount</h1>
                </div>
            </div>
            <div class="row mt-5">
                <div class="col-md-6">
                    <p class="text-center">Choose Amount:</p>
                    <form action="https://direct.tranzila.com/terminal_name/iframenew.php" target="tranzila" method="POST" novalidate="novalidate" autocomplete="off">
                        <div class="form-group">
                            <label for="amount">Amount:</label> <br>
                            <input name="sum" value="60" type="number" id="sum" class="form-control" readonly />
                            <span class="text-danger"></span>
                        </div>
                        <input type="hidden" name="buttonLabel" value="Pay" />

                        <input type="hidden" name="bit_pay" value="1" />
                        <input type="hidden" name="maxpay" value="3" />
                        <input type="hidden" name="cred_type" value="8" />
                        <input type="hidden" name="success_url_address" value="https://yoursite.com/success_url_address" />
                        <input type="hidden" name="fail_url_address" value="https://yoursite.com/fail_url_address" />
                        <input type="hidden" name="currency" value="1" />

                        <button type="submit" name="submit" class="btn btn-primary mt-3" value="pay">pay</button>
                    </form>
                </div>
            </div>
            <div class="row mt-5">
                <div class="col-md-6">
                    <div class="" style="width: 800px; height: 800px;">
                        <iframe id="tranzila-frame" allowpaymentrequest='true' name="tranzila" src="" style="width: 100%; height: 100%;"></iframe>
                    </div>
                </div>
            </div>
        </section>
    </div>
</main>
Recurring Payments
Recurring payments, also known as subscription payments or auto-pay, involve charging a customer’s credit card on a pre-set, regular schedule. This could be monthly, quarterly, or annually, based on the terms agreed upon with the customer or set by yourself.
Examples: Let's assume we want the user to pay 100 NIS for joining our service and 20 NIS each month afterwards for 12 months:
sum = 100
recur_sum=20
recur_transaction=4
recur_payments=12
<main class="min-h750">
  <div class="container">
    <section id="main-content">
      <div class="row text-center mt-5">
        <div class="col">
          <h1 class="display-3 text-primary">Pay Amount</h1>
        </div>
      </div>
      <div class="row mt-5">
        <div class="col-md-6">
          <form action="https://direct.tranzila.com/tranzila1/iframenew.php" target="tranzila" method="POST" novalidate="novalidate" autocomplete="off">
            <div class="form-group">
              <input name="sum" type="hidden" value="100" type="number" id="sum" class="form-control" readonly />
              <span class="text-danger"></span>
            </div>
            <input type="hidden" name="buttonLabel" value="Pay" />
            <input type="hidden" name="lang" value="il" />

            <input type="hidden" name="recur_sum" value="20" />
            <input type="hidden" name="recur_transaction" value="4" />
            <input type="hidden" name="recur_payments" value="12" />
            <input type="hidden" name="success_url_address" value="https://yoursite.com/success_url_address" />
            <input type="hidden" name="fail_url_address" value="https://yoursite.com/fail_url_address" />
            <input type="hidden" name="currency" value="1" />

            <button type="submit" name="submit" class="btn btn-primary mt-3" value="pay">pay</button>
          </form>
        </div>
      </div>
      <div class="row mt-5">
        <div class="col-md-6">
          <div class="" style="width: 800px; height: 800px;">
            <iframe id="tranzila-frame" allowpaymentrequest='true' name="tranzila" src="" style="width: 100%; height: 100%;"></iframe>
          </div>
        </div>
      </div>
    </section>
  </div>
</main>
if we don't want to allow the user to pay the whole amount we can pass:
recur_transaction=4_approved
Apple Pay
As part of Tranzila's credit card clearing solutions, we enable integration with Apple Pay. Payment via Apple Pay allows customers to pay with the click of a button through Apple devices. This payment can be integrated as part of an app, E-commerce store, or landing page in various ways.
In this guide, we will describe the ways in which Apple Pay payment can be embedded.
Who can pay with apple pay:
- The payment method is only supported by APPLE devices with Touch ID or Face ID, or those connected to the same network as an APPLE device with Touch ID or Face ID.
These devices include APPLE devices such as IPHONE, IPAD, and APPLE laptops with a camera and/or fingerprint reader for user identification. You can see a full list of supported devices here. The payment method is only supported by APPLE software on these devices – namely, apps or the Safari browser. In other words, users on the CHROME browser cannot pay with APPLE PAY.
Payment via Apple Pay – General Explanation
In Israel, payment with APPLE PAY is essentially a credit card payment, where APPLE provides the user identity authentication infrastructure for the transaction only. After receiving approval from APPLE to make the payment, the transaction is processed by Shva.
After verifying the transaction with APPLE, APPLE sends to Shva, via Tranzila, a token used for charging. The translation of APPLE's token to the actual card number is performed by the credit card company/issuer.
Since this is the case, the response to an APPLE transaction is the regular response to a credit card transaction and includes the fields returned from a regular credit card transaction.
For Tranzila customers working with tokens, Tranzila treats the APPLE token as a regular credit card number, encrypts it on its servers, and returns it in the charging service as a Tranzila token for reuse.
Apple Pay exclusively supports transactions type(tranmode) A/AK and V/VK, Standard transaction and Verification (J5) and does not extend support to alternative transaction types like pre-authorization transactions, token creation only, etc.
The charging path in APPLE PAY differs between charging from a NATIVE app and charging through a web page. This document will detail the different paths to carry out these transactions.
Payment with Apple Pay through Tranzila's payment page - Pay
You can easily register for the Apple Pay service through us - you don't need to do anything on your end!
After your registration with us, we will add the button to our payment pages for you, pay.tranzila.com/terminal .
Merchant Requirement - Active credit card terminal with Tranzila, approved with an internet merchant number. Implementation and Transaction Process:
Tranzila's system will handle the transaction, and you will be able to monitor it through My Tranzila. Please note that the last 4 digits displayed in our interface are the customer's Apple Pay card uniq identifier (which they can find in their Wallet app settings) and not the last 4 digits of their card.
Integration of Apple Pay Payment on the Website - Through Iframe and Hosted Fields
Merchant Requirements:
- Active credit card terminal with Tranzila, approved with an internet merchant number.
- The merchant must provide Tranzila with the domain(s) from which the payment will be made.
- Accordingly, the merchant should install a verification file provided by Tranzila on each of the specified domain/server.
- Inform us after the verification file has been installed so that we can proceed with the registration of the terminal for Apple Pay service through Tranzila.
Implementation and Transaction Process:
Download the required verification file for activating the APPLE PAY JS LIBRARY, which must be embedded on the website where the payment is processed. The file must be placed in the directory (https://www.my-website.com/.well-known/apple-developer-merchantid-domain-association) on your server with the original name as in the file you open:
You can download the file here (extract the compressed file and embed the .dat file inside).
For React/Next/Remix users add the file to the public directory inside .well-known folder (.well-known/apple-developer-merchantid-domain-association). for Angular look in this thread
Embed our JQuery library on the page that displays the iframe:
<script type="text/javascript" src="https://code.jquery.com/jquery-3.6.0.js"></script>
<script>document.write('<script src="https://direct.tranzila.com/js/tranzilanapple_v3.js?v=' + Date.now() + '"><\/script>');</script>
<script>var $n = jQuery.noConflict(true);</script>
If there is a conflict issue with an existing JQuery file, it is recommended to add the noConflict script. You can try with and without the true argument in the function:
<script type="text/javascript" src="https://code.jquery.com/jquery-3.6.0.js"></script>
<script>document.write('<script src="https://direct.tranzila.com/js/tranzilanapple_v3.js?v=' + Date.now() + '"><\/script>');</script>
Please note that this implementation guide assumes you have a certain level of technical knowledge in web development and server management.
Google Pay
A new payment method, Google Pay, has been successfully launched. Here are some key points to note about Google Pay:
- Currently, the service will only work with the new IFRAME page.
- Customers using the multiple products page (PAY), the DIRECT page, or old IFRAME pages will not be able to enable this payment method.
- You can view an example of the new IFRAME page integrated with Google Pay at the following link: Google Pay IFRAME Example
- As per Google's requirement, the service will be free for our customers and will be available at no cost to terminals.
- The only condition for using this payment method is to send a parameter to the IFRAMENEW page or to activate the Google Pay option from MY TRANZILA under "Settings" > "Terminal" > "IFRAME Settings".
- The service is not available for Express customers at the moment, but may be supported by Express terminals in the future.
- Google Pay will work without issues on standard and regular terminals.
- If the new IFRAME is embedded on a site without a valid SSL certificate, the button will not load. For example, if the IFRAMENEW page is hosted on an unsecured HTTP page, the Google Pay payment option will not appear within the IFRAME.
- Google Pay payments are supported on various hardware types and browsers, including computers, Android, and Apple devices. Supported browsers are Google Chrome, Mozilla Firefox, Apple Safari, Microsoft Edge, and Opera.
- The button is built according to Google's instructions. Currently, it is available in all supported languages except Hebrew (if a parameter is sent that changes the IFRAME language to Hebrew, the Google button will be displayed in English).
- Google Pay will support all currencies currently supported on the payment page (ILS, USD, EUR, GBP, etc.).
- Google Pay exclusively supports transactions type(tranmode)A/AK and V/VK, and does not extend support to alternative transaction types like pre-authorization transactions, token creation only, etc.
Google Pay Payment Process
The payment method can be activated in one of two ways:
- By sending the parameter
google_pay=1to the new IFRAME page, or alternatively, by activating Google Pay from MY TRANZILA under "Settings" > "Terminal" > "IFRAME Settings" by clicking the switch and saving.
When the end customer reaches the payment page, this is how the payment page will appear:
-
After clicking on the Google Pay button, a Google popup will open asking the customer to log in to their Google account (if they are already logged in to their Google account, it will go straight to choosing the card) and then to select the saved Google card they wish to use (or add a credit card number if necessary).
-
Then, they will be redirected to the success/failure page defined in that terminal.
-
Google Pay transactions create a token that can be used for additional actions such as forcing a transaction or crediting a transaction, without the need for the end customer's card number.
Enabling Secure Payments with allow="payment"
When integrating Google Pay within an iframe, set the allow attribute to "payment" to enable secure access to the Web Payments API.
Example Usage:
To enable secure payments through Google Pay in an iframe, use the following HTML snippet:
<iframe src="https://direct.tranzila.com/myterminal/iframenew.php" allow="payment"></iframe>
Why Use allow="payment"?
Adding allow="payment" ensures that the iframe can securely access payment APIs, enhancing the security of the payment process.
Browser Support:
Not all browsers support the allow="payment" attribute, so it's recommended to test the integration across different browsers to ensure compatibility. For more information, you can refer to the MDN Web Docs on Permissions Policy for payment.
Notify Url
In order to add a notify url we will add the param notify_url_address:
<main class="min-h750">
    <div class="container">
        <section id="main-content">
            <div class="row text-center mt-5">
                <div class="col">
                    <h1 class="display-3 text-primary">Pay Amount</h1>
                </div>
            </div>
            <div class="row mt-5">
                <div class="col-md-6">
                    <p class="text-center">Choose Amount:</p>
                    <form action="https://direct.tranzila.com/terminal_name/iframenew.php" target="tranzila" method="POST" novalidate="novalidate" autocomplete="off">
                        <div class="form-group">
                            <label for="amount">Amount:</label> <br>
                            <input name="sum" value="5" type="number" id="sum" class="form-control" />
                            <span class="text-danger"></span>
                        </div>
                        <input type="hidden" name="buttonLabel" value="Pay" />

                        <input type="hidden" name="success_url_address" value="https://yoursite.com/success/process.php" />
                        <input type="hidden" name="fail_url_address" value="https://yoursite.com/failure" />
                                                <input type="hidden" name="notify_url_address" value="https://yoursite.com/notify" />
                        <input type="hidden" name="currency" value="1" />
                        <input type="hidden" name="bit_pay" value="1" />

                        <button type="submit" name="submit" class="btn btn-primary mt-3" value="pay">Pay</button>
                    </form>
                </div>
            </div>
            <div class="row mt-5">
                <div class="col-md-6">
                    <div class="" style="width: 800px; height: 800px;">
                        <iframe id="tranzila-frame" allowpaymentrequest='true' name="tranzila" src="" style="width: 100%; height: 100%;"></iframe>
                    </div>
                </div>
            </div>
        </section>
    </div>
</main>
Or add through through tranizla settings:

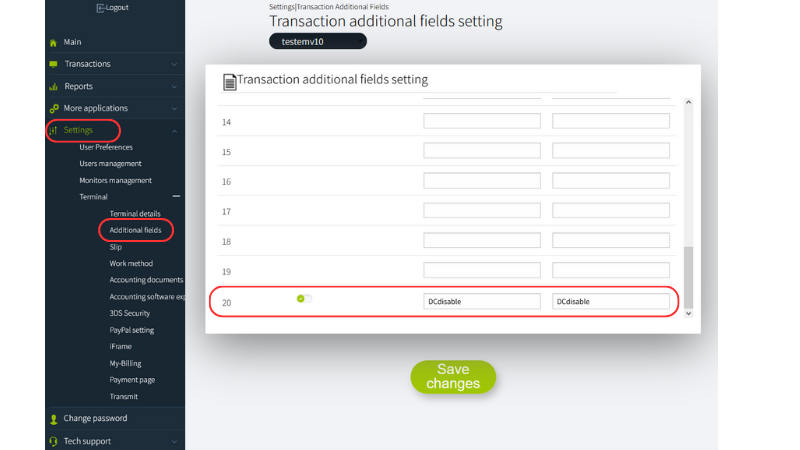
Preventing Duplicate Transactions
DCdisable
The prevention solution is based on a unique value sent for a transaction under the parameter DCdisable. Below are the conditions for using the parameter:
-
The solution is intended to work with a Direct IFRAME page.
-
You must log into the my.tranzila system and go to the "Additional Fields for Transaction" screen, located under the terminal settings menu, and define only field 20 as the field intended for identifying DCdisable - duplicate charge.
-
If it is detected that the unique value in DCdisable has already been used once, no additional charge will be made.
-
The check in our DB will be performed up to 24 hours back, at the parent terminal level.
-
If a transaction fails the first time, no check will be performed for it on DCdisable. We will display the following message if a duplicate transaction is detected: "This payment has already been made, please contact the business" or "This payment has already been paid. Please contact customer service."
-
The customer must pass the DCdisable parameter with a unique value for that transaction.
-
The customer must send the parameter u71=1 if working with the Direct page/IFRAME.
-
If you have parent and child terminals, you must define the parameter in both the parent and the child.
-
We recommend providing a long and complex unique value (the limit for the value is 254 characters).
Handshake
In the fraud prevention solution through the execution of HandShake, there is a request to Tranzila, before directing the paying customer to the checkout page, where a unique identifier is created for the amount and transaction details.
The unique identifier will be passed to the payment page after its receipt, along with the rest of the transaction data, but only there will the paying customer enter the card details for the charge.
If the transaction amount changes, and the transaction details are not identical to the data we have stored with the unique identifier, no transaction will be made at all and an error will be received with a unique code.
We recommend implementing and using the HandShake solution to prevent fraudulent transactions.
Handshake is available for use in both iframe and hosted fields payment pages.
Using the HandShake solution requires the purchase of a token module.
-
You must enter the checkout page settings (see "Merchant Checkout Page Setup" section).
-
Enter "Information Security" and mark the HandShake field as enabled.
-
A request for a handshake must be sent before transferring the transaction to the checkout page.
-
When using the Handshake in hosted fields integration, there is no need to make changes in the settings mentioned above.
From the moment the HandShake function is activated, you will not be able to process payments without receiving the HandShake token, meaning, the solution must be fully implemented in order for you to process payments properly.
The URL to perform the handshake is:
https://api.tranzila.com/v1/handshake/create
| Paramater | Description |
|---|---|
| Supplier | Terminal Name |
| TranzilaPW | Terminal Token Password |
| Sum | Transaction amount |
The Request must be sent in GET
example:
https://api.tranzila.com/v1/handshake/create?supplier=yourteminalname&sum=1&TranzilaPW=YourTerminalPassword
The
new_processfield must be passed to the iframe with a value of 1 so that the checkout page can perform the verification.new_process=1
-
The request returns a
thtkparameter with a transaction identification string. This parameter, along with the value received, must be sent to the checkout page along with the regular parameters that control the page display (like amount, currency, etc.). -
After submitting the form and before executing a transaction, a comparison of the amount will be made between what you sent at the handshake and what was sent from the checkout page. If the amount is not identical, "Illegal Operation 912791" will be printed without conducting any transaction. If the amount is the same, the transaction will proceed with the parameters sent at the handshake, which are also the ones that will return at the end of the transaction execution.
-
Attempting to access the checkout page as a standalone action, without prior handshake validation, will result in an error message.
Please note
Handshake data is retained for 20 minutes to allow for potential direct retries. Successful validations reset the timer.
Dtran
The Dtran duplicate transaction prevention mechanism is based on checking transaction data within a time frame defined in the terminal settings.
If you choose to work with this Dtran, you will only need to define the time range without sending a specific parameter.
During the defined time range, our system checks the details of the executed transaction and identifies if there is a duplication for that specific transaction.
Currently, the time range can be set in the old system - secure5 under setting configuration 1:
INSERT SCREENSHOT
Transaction Details Checked for Duplicate Detection:
All transaction fields will be checked - including additional transaction fields
Highlights:
- This mechanism allows the client to pass the transaction a second time as a duplicate, within the defined time range, and to receive the response a second time with the addition of the parameter -
duplicate_transaction_detectedwhich indicates the transaction duplication, which would not be possible with the Dcdisable mechanism. - The development works only for transactions sent via API through
tranzila71u.cgiortranzila71pme.cgi - Clients working with our clearing page must pass to the clearing page (along with all parameters), also the parameter
u71=1 - If a duplicate transaction is detected and there is already a response from the bank - the response from the duplicate transaction + parameter
duplicate_transaction_detected=1will be returned. If there is still no response from the bank about the original transaction, then 'Response=-96&reason=Double transaction detected. Please contact the company' will be returned - The blocked transaction will appear in the terminal as a failure with error 888 - Double transaction blocked.